
Online help · version 1.0
Hyperstellar FX help
Installation, freezing and every control of the effect — from the four freeze layers and ORBIT to the spectral effects, reverb, filters, modulation, MIDI Learn and licence activation.
Introduction
Hyperstellar FX is a spectral freeze effect. It always listens to the last seconds of its input, and when you press FREEZE it holds that moment as an endless, slowly breathing tail — not a loop, but a sound made anew all the time from the frozen partials, without clicks and without a loop point. Up to four frozen layers can play at once.
Around the freeze there is a freeze sequencer (ORBIT), effects that keep the frozen partials moving (SPECTRAL), an underwater effect, a delay, a shimmer reverb and a limiter, per-layer filters and a deep modulation section. Frozen layers can be kept with your project and in a library of saved freezes. It runs as an AU and VST3 plugin and as a standalone application.
Every parameter can be automated in your DAW, and every knob and button can be played from a MIDI controller with MIDI Learn. Hover over a control to see what it does.
Installation
macOS
Hyperstellar FX needs macOS 10.13 High Sierra or later and runs natively on Apple Silicon and on Intel Macs. The full installation takes about 45 MB.
Download the installer package (.pkg), double-click it and follow the installer. You can
choose which parts to install:
- AU plugin:
/Library/Audio/Plug-Ins/Components/Hyperstellar FX.component - VST3 plugin:
/Library/Audio/Plug-Ins/VST3/Hyperstellar FX.vst3 - Standalone application:
/Applications/Hyperstellar FX.app
Presets and the licence file are kept in /Users/Shared/Soundyan/Hyperstellar FX/.
Windows
Download the setup file (.exe), run it and follow the installer. If Microsoft Defender
SmartScreen warns about a new file, see the step-by-step note in the
Interstellar Waterphone help — it is the same for
every Soundyan installer. Presets are kept in
C:\Users\Public\Documents\Soundyan\Hyperstellar FX\.
Getting started
Insert Hyperstellar FX on an audio track or a bus — a waterphone, guitar, voice, synth or a field recording, anything that comes into the plugin. It works in mono and stereo.
- Play something.
- Click one of the four portholes. The last moment of the input becomes a frozen layer, and the porthole lights up.
- Play on over it, freeze more layers, then click a lit porthole to let its layer fade away.
Standalone application. Choose the audio input and output and the MIDI input in Options → Audio/MIDI Settings. JUCE mutes the audio input by default when input and output are on the same device — untick Mute audio input, or you will not hear anything.
MIDI in a DAW. To play the plugin from MIDI (MIDI Learn, program change), send MIDI to it. In Logic Pro the AU is in the MIDI-controlled Effects list; in other hosts route a MIDI track to the plugin.
Latency. The limiter's look-ahead adds 5 ms of latency, which the plugin reports, so your DAW compensates for it. A frozen layer keeps playing with no input, so let the plugin run after the end of the region if you want to hear the tail.
Projects. Whether the frozen layers come back when you reopen a project, and how the plugin reacts to PLAY and STOP in your DAW, is set in SESSION.
The window
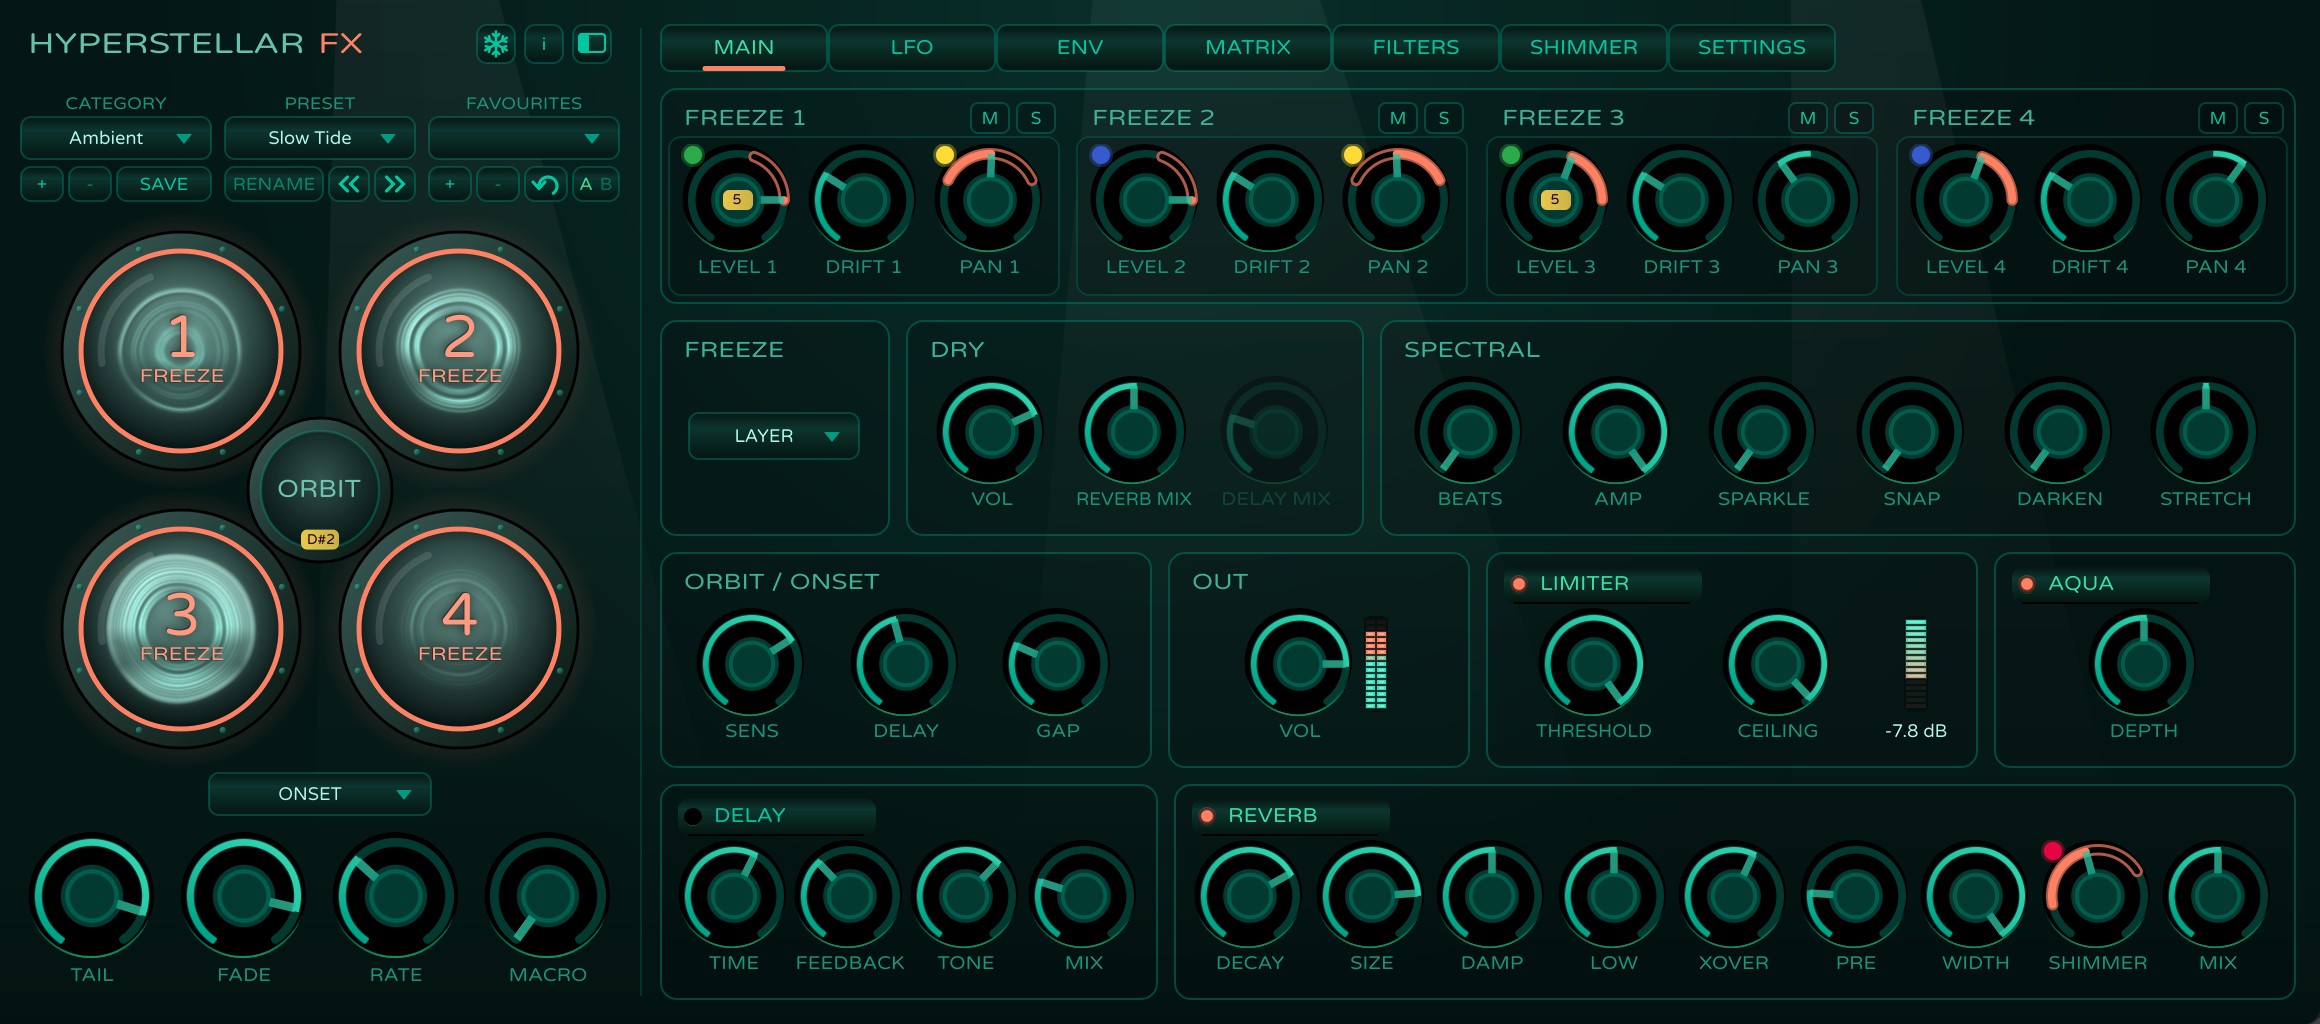
Hyperstellar FX has two views; switch with the COMPACT icon (a small window) at the right of the header.
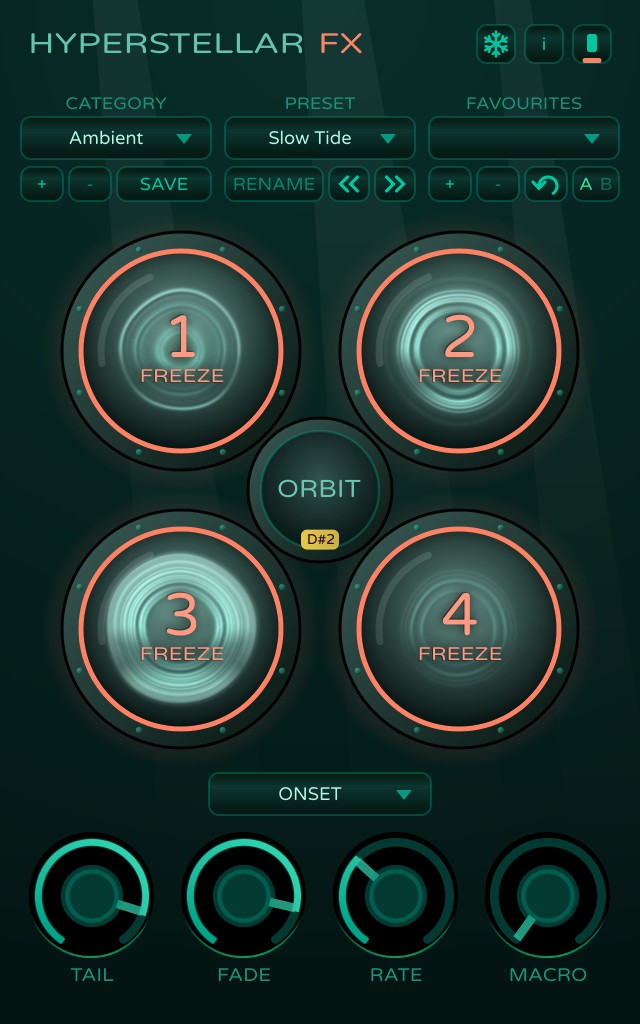
- Compact — the four FREEZE portholes, ORBIT between them, the ORBIT mode list and the TAIL, FADE, RATE and MACRO knobs.
- Full — the same panel on the left, and the tabs MAIN, LFO, ENV, MATRIX, FILTERS, SHIMMER and SETTINGS on the right.
The preset bar is under the title in both views. Next to COMPACT in the header, the snowflake opens SAVED FREEZES, and the i button shows the version and the licence — its HELP button opens this page. The view you chose is remembered for every new instance.
Freezing
Hyperstellar FX keeps the last 4 seconds of its input. When you press FREEZE, it takes up to the last 3 seconds and hands them to the spectral engine, which plays them back as a living tail of partials for as long as the layer is on. A new layer fades in over the FADE time, and fades out the same way when you release it.
- If you freeze just before a note — while the input is still silent — Hyperstellar FX waits for the sound, so the layer does not freeze the silence. Freezing a silent input freezes silence.
- Pressing FREEZE again on a layer that is fading out starts a new layer that crossfades with the old one.
- The frozen layers are not saved in presets. With SESSION at SAVE FREEZE (the default) they are saved with your project and come back when you open it. To keep a layer for another project, save it in SAVED FREEZES.
With SPECTRAL CLOUD on (in SETTINGS) each lit porthole shows the real spectrum of its layer: low partials as rings near the centre, high ones near the rim, brighter when louder.
FREEZE 1–4
On the MAIN tab each layer has its own group of knobs:
- LEVEL — the layer's volume, −60 to +6 dB.
- DRIFT — where in the captured seconds the layer starts (0–100 %). At 0 it freezes the very last moment. Higher values start earlier, and the tail then travels slowly forward to the moment you pressed FREEZE, over about 30 seconds. It is read when you freeze, so it changes the next layer, not the one playing.
- PAN — the layer's position from L100 to R100. A mono layer is panned at constant power; a stereo layer is balanced (L100 keeps only its left channel).
Mute and solo
The M and S switches next to each FREEZE title mute and solo a layer. A muted layer stays frozen and keeps running silently, so unmuting brings back the same sound — releasing FREEZE would throw it away for good. MUTE wins over SOLO. In the compact view, Alt-click a porthole to mute it and Shift-click to solo it. ORBIT skips layers you cannot hear.
Tail, fade and mode
- TAIL — the volume of all frozen layers together, −60 to +6 dB.
- FADE — how long a layer takes to fade in and out, 0.02–10 s (1.5 s by default).
- MODE (the FREEZE section) — LAYER: the input plays on and the frozen layers sound under it. REPLACE: the frozen sound takes the input's place — the dry signal fades out as the loudest layer fades in, and comes back when the layers are released.
Dry
The DRY section sets what happens to the input signal that passes through the plugin:
- VOL — the level of the dry signal, −60 to +6 dB.
- REVERB MIX — how much of the dry signal goes into the reverb (0–100).
- DELAY MIX — how much of it goes into the delay (0–100).
So you can, for example, keep the dry instrument clean while the frozen layers float in a large space — or set VOL to its minimum and use Hyperstellar FX as a pure freeze on a send. The two mixes are dimmed while the reverb or the delay is off. The dry signal does not go through AQUA or the filters.
Spectral
These knobs act on the frozen partials, so the tail never sounds static. They affect every layer.
- BEATS — every partial gets a slightly detuned twin and pulses against it; the knob sets how fast.
- AMP — how deep the BEATS pulsing is. At 0 there are no beats at all.
- SPARKLE — every partial flickers on its own, up and down in level.
- SNAP — focuses the sound on a harmonic series: partials close to it get stronger, the rest fade. Organ-like and pure at high settings.
- DARKEN — the high partials slowly die away, as in a ringing bell. Turning it back down brings the brightness back.
- STRETCH — stretches the partials apart (to the right — bell-like) or squeezes them together (to the left — soft, strange metal).
Orbit
The button between the four portholes is ORBIT, a freeze sequencer. It freezes and releases the layers one after another, so a single phrase grows into a slowly turning harmony. The coral rim shows that ORBIT is on, and the arc along it shows how far the current step has gone.
RATE sets the length of a step at the host's tempo: 4 bars, 2 bars, 1 bar, dotted half, half, dotted quarter or quarter note. The first step happens at once.
Modes
Choose the mode in the list under the portholes:
- ROUND — FREEZE 1, 2, 3, then 4 on and 1 off, 1 on and 2 off… round and round, with three layers playing at a time. Switching ORBIT off releases the layers one by one, oldest first.
- ONE SHOT — freezes 1, 2, 3, 4 once and holds them. Switching ORBIT off releases them one by one.
- TRIGGER — no clock: the button becomes NEXT, and every click (or MIDI message) is one ROUND step. RATE is not used.
- ONSET — ORBIT listens to the input: every strike is one ROUND step.
- NEW NOTE — every new steady note in the input is one ROUND step, so a melody builds up a pad. The same note again — or the same note an octave away — does not count.
Onset and new note
In ONSET and NEW NOTE the ORBIT section on the MAIN tab is active (its title shows the mode):
- SENS — how sensitive the strike detection is, 0–100 (70 by default).
- DELAY — how long after the strike or note the layer is frozen, 0–2000 ms (400 ms by default — just after the attack).
- GAP — the shortest time between two steps, 50–4000 ms (200 ms by default).
The ORBIT porthole flashes on every strike it hears even while ORBIT is off, so you can set SENS by eye before you start. Switching ORBIT off releases the layers one by one, every RATE.
Pause
While ORBIT runs, a short click on it pauses the sequence — the layers keep playing — and the next short click resumes it exactly where it stopped. The button shows PAUSED and its rim breathes. Hold the button for half a second to switch ORBIT off. While the layers are being released, a click pauses the release and holding the button starts ORBIT again.
The same works from a MIDI footswitch learnt on ORBIT (it must be momentary). PAUSE can also be learnt on a separate CC or note — right-click ORBIT.
Effects
Each effect has a switch in its title. The frozen layers go through AQUA, then the delay and the reverb; the dry signal joins them in the delay and the reverb with its own mixes. Then come the output volume and the limiter.
Aqua
Puts the frozen layers under water: a slow pitch sway and a wandering murky low-pass, like the water moving inside a waterphone. DEPTH sets how much. Off by default.
Delay
Echoes before the reverb, so the repeats ring in the same space. Off by default.
- TIME — the time between repeats, 1 ms – 2 s.
- FEEDBACK — how many repeats.
- TONE — the brightness of the repeats.
- MIX — the level of the repeats of the frozen layers (the dry signal has its own DELAY MIX).
Reverb
A shimmer reverb.
- DECAY — the reverb time, 0.2–20 s.
- SIZE — the size of the space.
- DAMP — darkens the tail as it decays.
- PRE — pre-delay, the gap before the reverb starts (0–200 ms).
- WIDTH — the stereo width of the reverb.
- SHIMMER — how much of the tail climbs, an octave up by default. Its interval, band and colour are on the SHIMMER tab.
- MIX — how much reverb the frozen layers get (the dry signal has its own REVERB MIX).
Out and limiter
- VOL (OUT) — the output level, −60 to +6 dB. The meter next to it shows the left and right channels at the very end of the chain.
- THRESHOLD (LIMITER) — the level the peaks are held down to, −24 to 0 dB. Lower settings add the same amount of makeup gain, so the sound gets louder and denser.
- CEILING — the highest level the output reaches, −12 to 0 dB.
- The meter on the right shows how much the limiter is reducing the level.
Four frozen layers with a long reverb add up quickly — keep the limiter on. Switched off, it still delays the sound by its look-ahead, so the reported latency stays right.
Shimmer
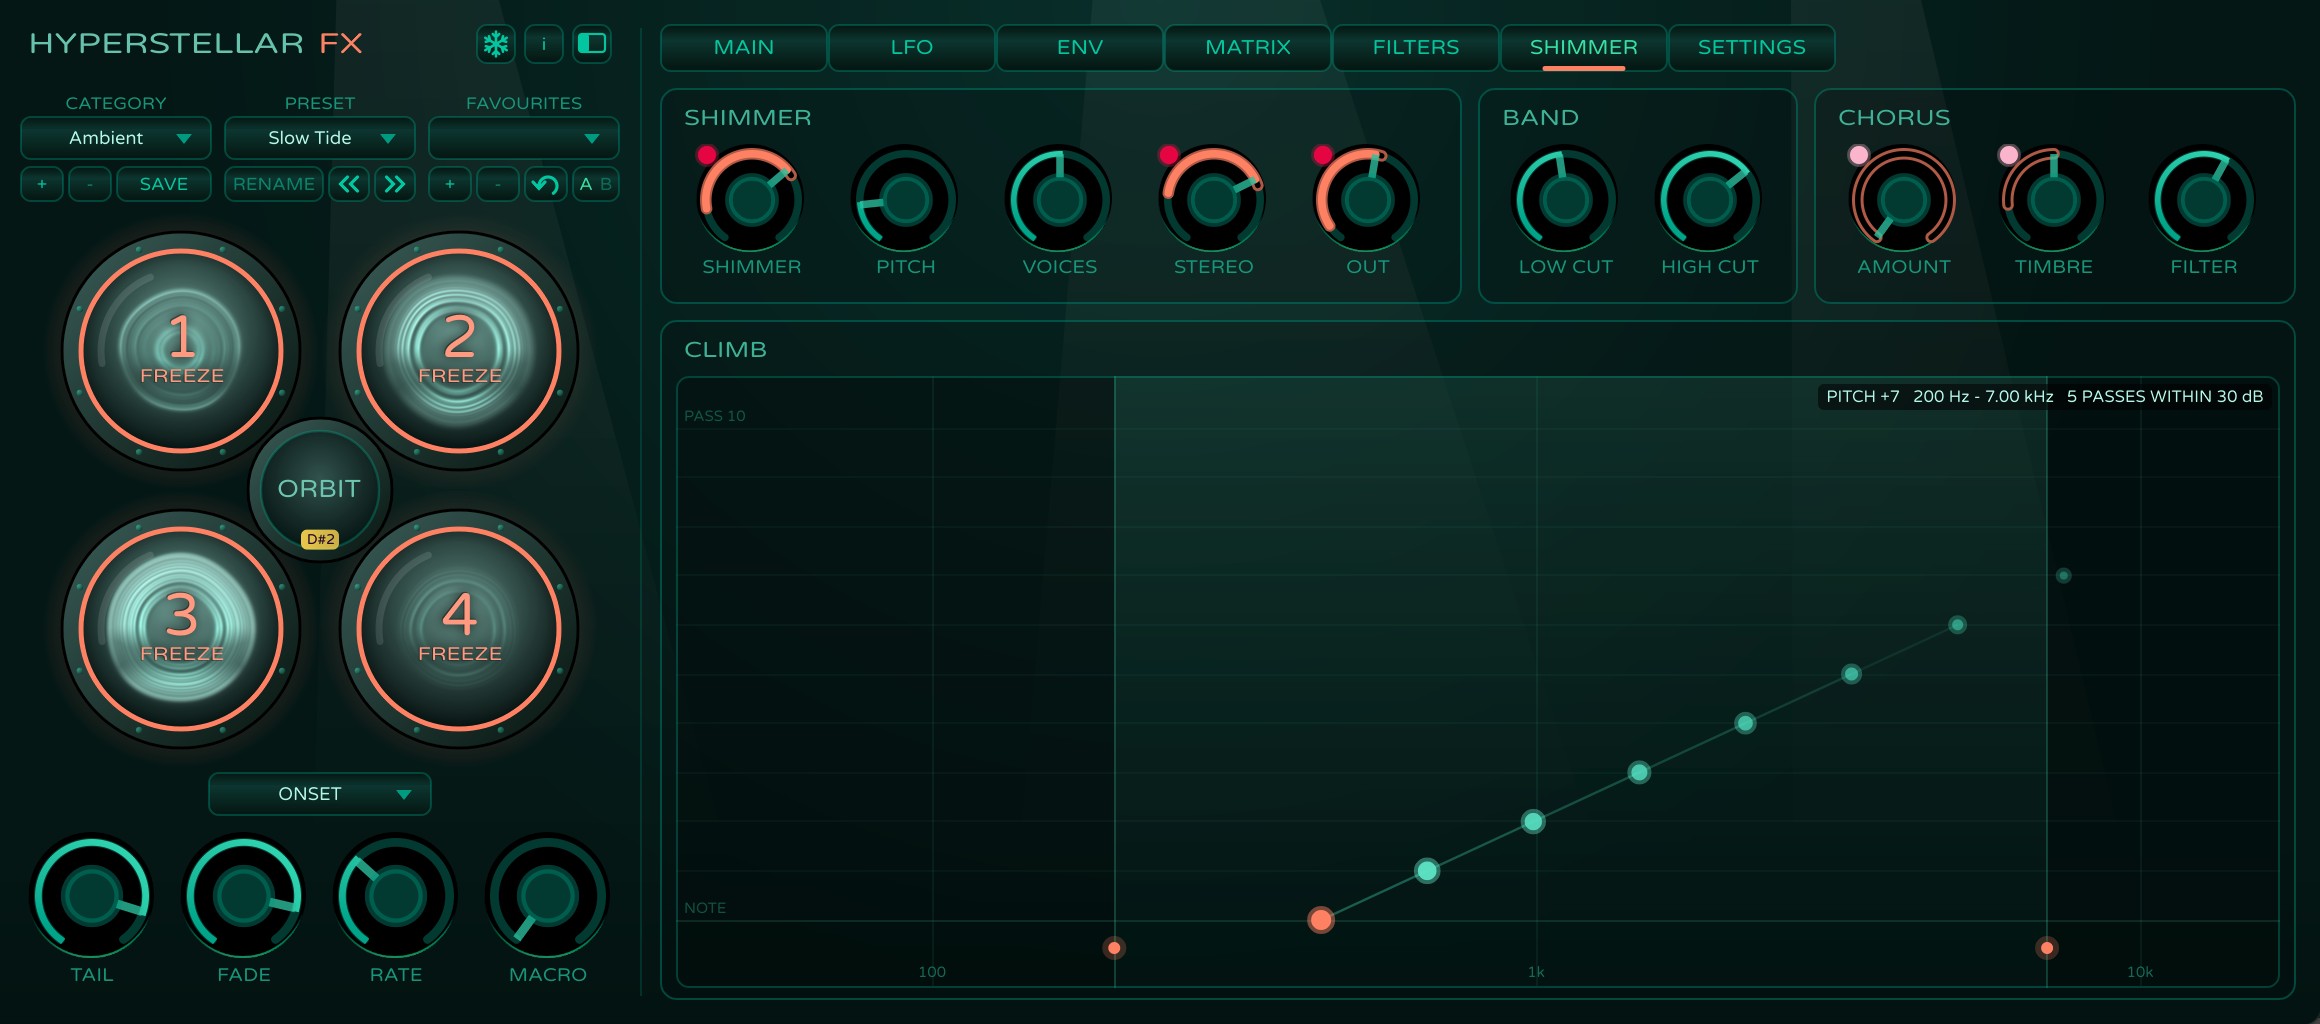
The shimmer sends the reverb's tail back into the reverb transposed, so every trip round the loop lifts what is left of it once more. Above the sound a choir slowly rises — not a single copy an octave higher, but a continuous climb that fades only when it leaves the shimmer's band. The SHIMMER tab sets how it climbs; the reverb itself (DECAY, SIZE, DAMP…) stays in the REVERB section on MAIN, and the shimmer is heard only while the reverb is on.
The frozen layers and the dry signal share one reverb, so they share its shimmer as well. At their default settings the knobs on this tab give the classic octave-up shimmer.
Shimmer, pitch, voices
- SHIMMER — how much of the tail goes round through the shimmer, 0–100 (35 by default). The same knob as SHIMMER in the REVERB section. A long DECAY makes the shimmer last longer, not louder.
- PITCH — the interval each trip adds:
- −12 — an octave down: dark and huge.
- +7 — a fifth: subtle, it sits inside the harmony.
- +12 — an octave up: the classic (default).
- +19 — an octave and a fifth: brighter, airy.
- +24 — two octaves: glassy.
- +12 +19 — both at once: a rising chord.
- −12 +12 — down and up at once.
- VOICES — 2, 3 or 4 overlapping grains in the pitch shifter. 2 is the classic. On steady tones — frozen layers, especially after SNAP or a strong DARKEN — the shimmer can slowly swell and dip; 3 and 4 halve that, at the cost of an octave a little less exact.
- STEREO — 0–100 (0 by default). At 0 one shimmer climbs on the mono sum of the tail and gets its width from the reverb. Turned up, the left and right sides climb on their own, each with its own grain — a wide, moving shimmer at the same level.
- OUT — 0–100 (0 by default). The transposed tail straight to the output, outside the loop: you hear the transposition at once, and it never feeds back. 100 is as loud as the tail. It works at SHIMMER 0 too — one transposed copy of the tail, without the climb.
Band
The shimmer climbs only inside its band; whatever leaves it dies away. A narrower band also makes the shimmer quieter.
- LOW CUT — the bottom of the band, 50–1000 Hz (200 Hz by default). It keeps the low rumble from being dragged up; lower lets the octave-down settings sink further.
- HIGH CUT — the top of the band, 2–12 kHz (7 kHz by default). This is where the climb leaves the loop: higher means a longer, brighter climb, lower a shorter, darker one.
Chorus
Two copies of the shimmer, tuned slightly up and down, make a thicker octave.
- AMOUNT — how much of the copies is mixed in, 0–100 (0 = off, the default).
- TIMBRE — how far apart they are tuned, up to ±18 cents (50 by default).
- FILTER — a low-pass on the copies only: dark at 0, open at 100 (60 by default).
Climb
CLIMB draws what the shimmer does to one note: the note at the bottom, each trip round the loop one row higher, frequency from left to right. The lit area is the band between LOW CUT and HIGH CUT, and every dot is a transposed copy, as bright as what is left of it. The readout shows PITCH, the band and how many trips stay within 30 dB of the note. It is a picture of the settings, not a measurement of the sound — the reverb's own decay is left out. Under modulation it follows the settings as they play.
Every knob on this tab can be modulated; PITCH and VOICES step from setting to setting. OUT follows the modulator sample by sample, so even a fast LFO is safe there: nothing goes back into the loop. SHIMMER, PITCH, STEREO and the chorus knobs can be played with MIDI Learn; VOICES, LOW CUT, HIGH CUT and OUT cannot.
Filters
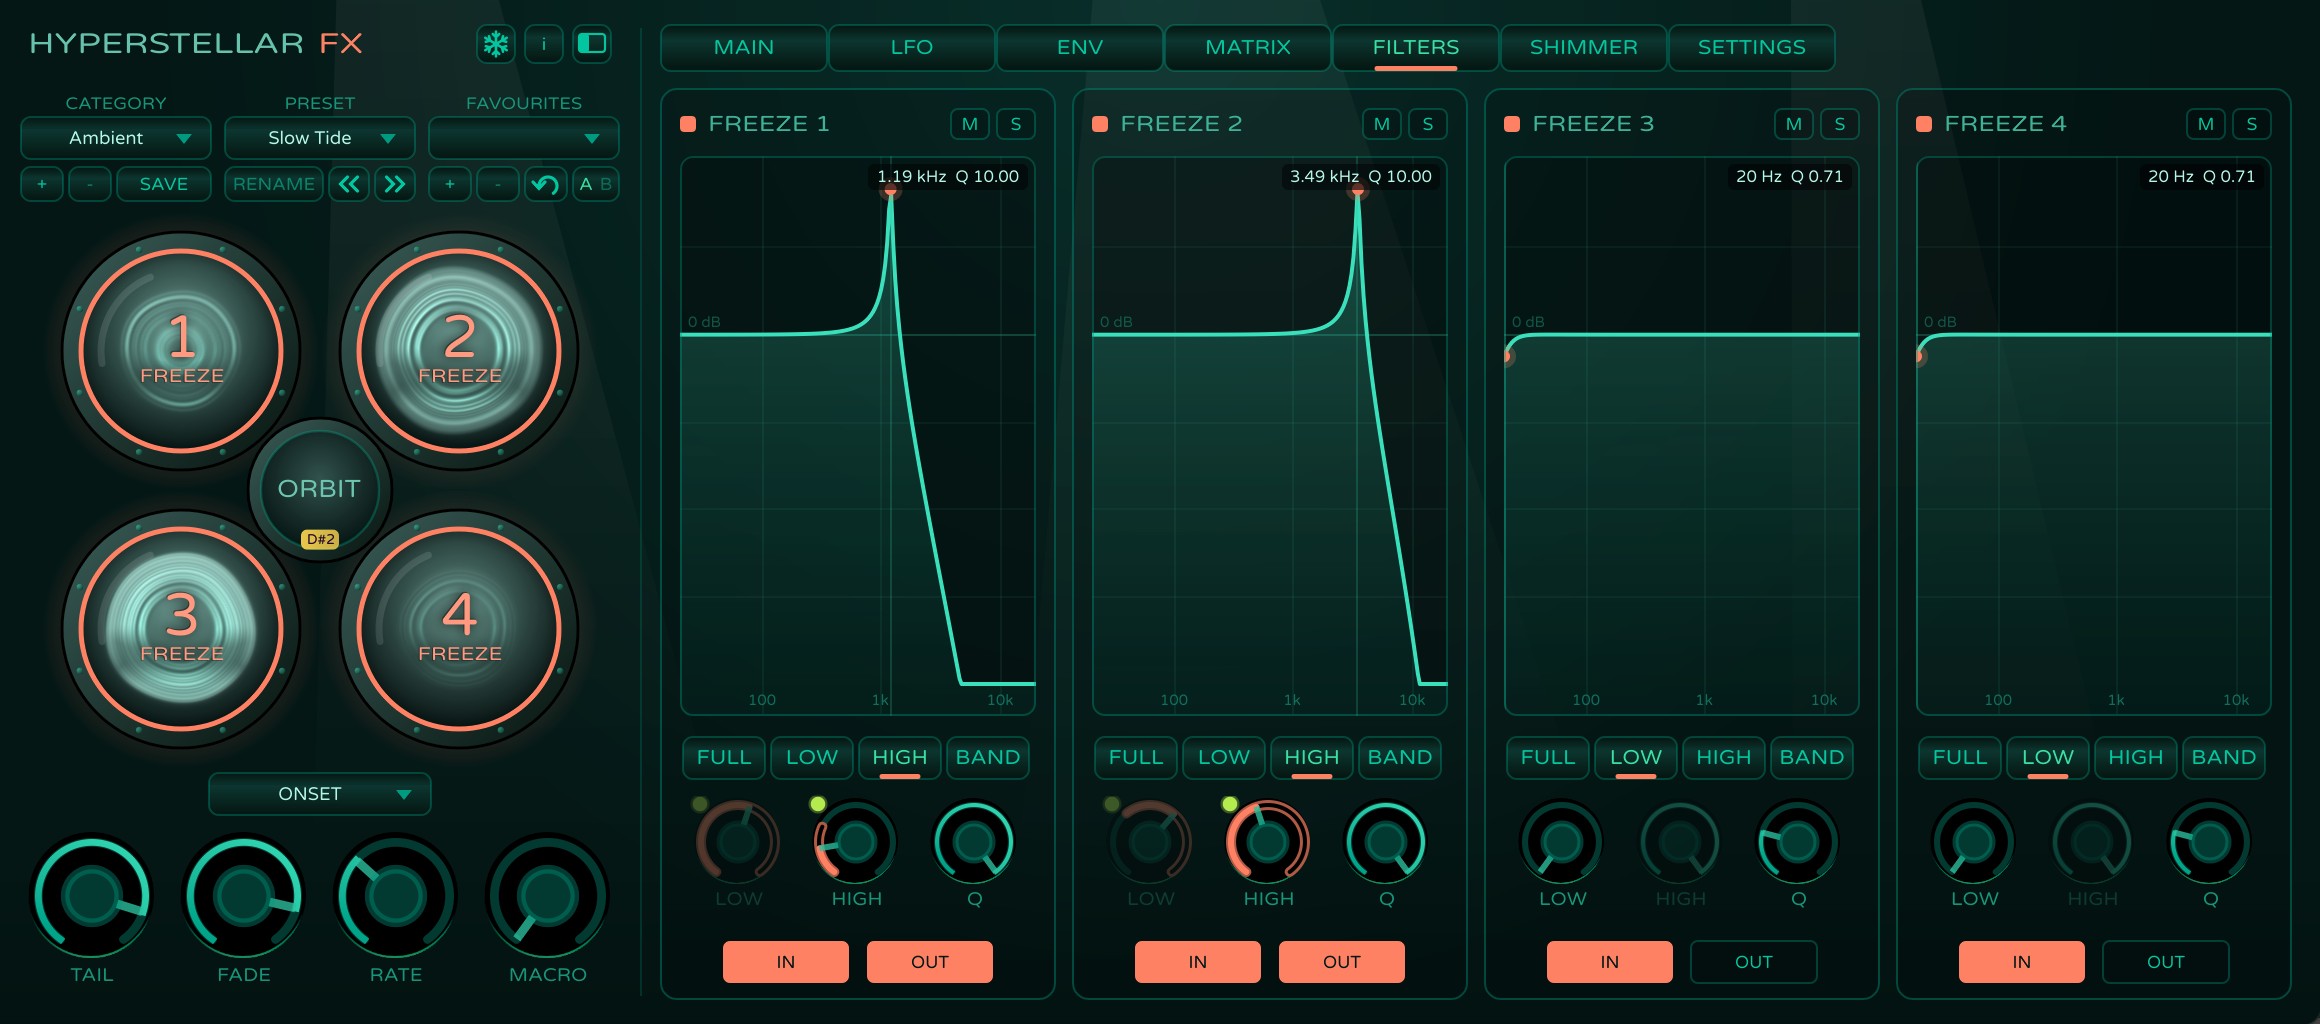
The FILTERS tab has a filter for each FREEZE layer, with a graph of its response. A frozen layer holds its low end for ever, and up to four of them add up — so filtering out rumble (from a contact microphone, for example) keeps the mix clean and the limiter calm.
- FULL / LOW / HIGH / BAND — no filter, a low cut, a high cut or both.
- LOW — where the low cut starts, 20–400 Hz.
- HIGH — where the high cut starts, 1–20 kHz.
- Q — 0.71 is flat; higher values add a resonant bump at the edge. Both edges cut 24 dB per octave.
- IN — filters what is frozen. It works on the next freeze; a layer that is already playing stays as it was.
- OUT — filters the playing layer, at once.
With IN and OUT both off the filter does nothing. By default every layer has a 20 Hz low cut on IN. Each panel also has the layer's M and S switches. LOW, HIGH and Q can be modulated, and the graph then follows the filter as it plays.
Modulation
Hyperstellar FX has four LFOs, four drawable envelopes, two input followers and the MACRO knob. Any of them can move any knob: the layers and the dry signal, TAIL and FADE, the spectral effects, AQUA, the delay, the reverb and the shimmer, the filters, ORBIT, the output and the limiter — and the knobs of the modulators themselves. Knobs that choose from a list (the shimmer's PITCH and VOICES, ORBIT's RATE, the BPM divisions) step to the nearest setting. The lists and buttons (SHAPE, TRIG, the filter type, MODE), the switches and MACRO itself cannot be modulated.
LEVEL, PAN, DRY VOL and the shimmer's OUT follow a modulator sample by sample, so they are the place for a fast tremolo or auto-pan; the other knobs follow it once per audio buffer. Moving the delay's TIME bends the pitch of the echoes, as on a tape delay.
LFO
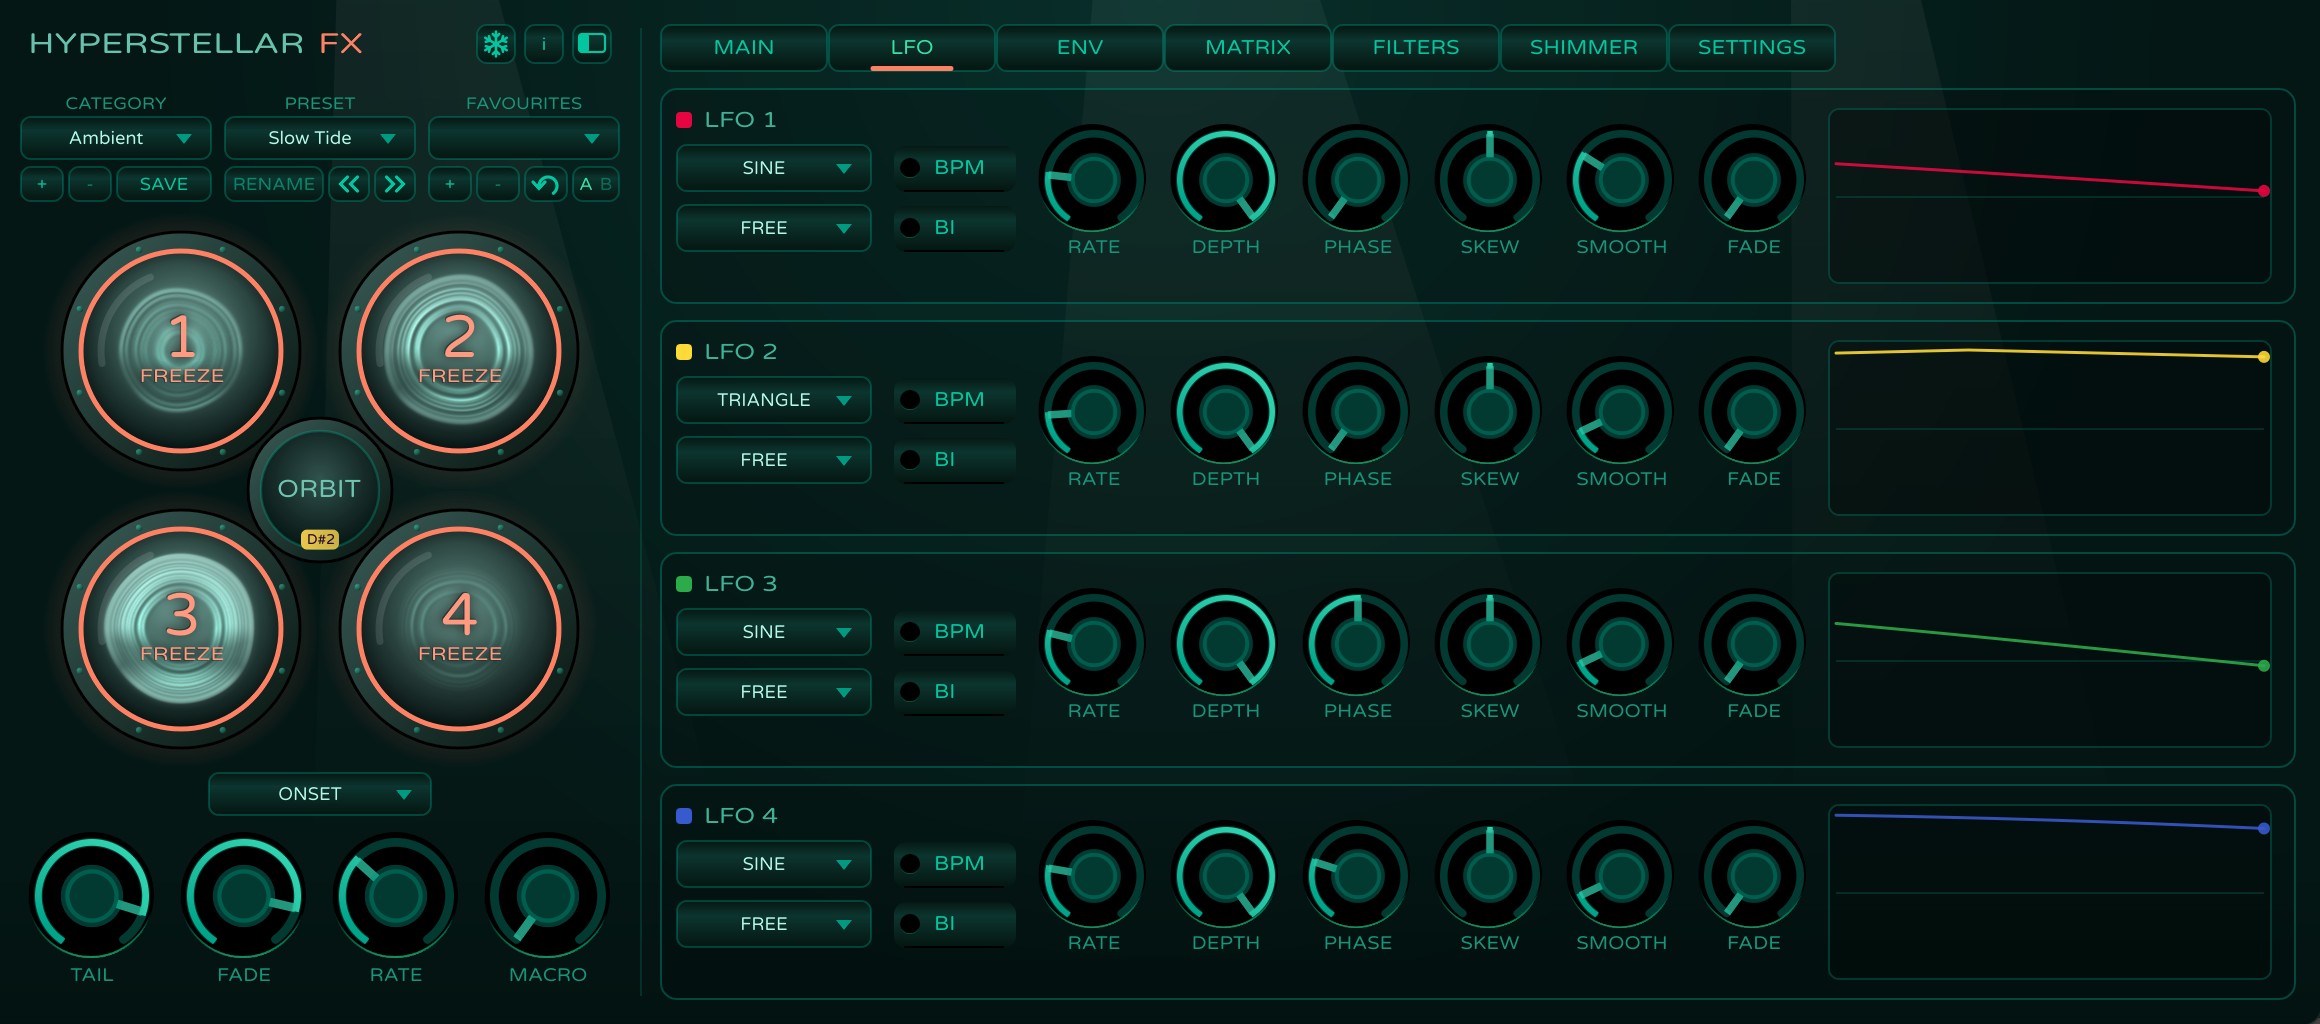
- SHAPE — sine, saw, square, triangle, drift, chaos, bounce, stairs, exp, log and sample & hold.
- RATE — 0.01–50 Hz; with BPM on, a division of the host's tempo, from 16 bars down.
- DEPTH, PHASE, SKEW and SMOOTH shape the wave; BI swings it around the middle of the range instead of from its start.
- FADE — after a FREEZE press the LFO fades in over this time (0–10 s).
- TRIG — FREE runs on its own (locked to the bar with BPM while the host plays), RETRIG restarts at every FREEZE press, ONE SHOT runs once from a FREEZE press.
ENV and input
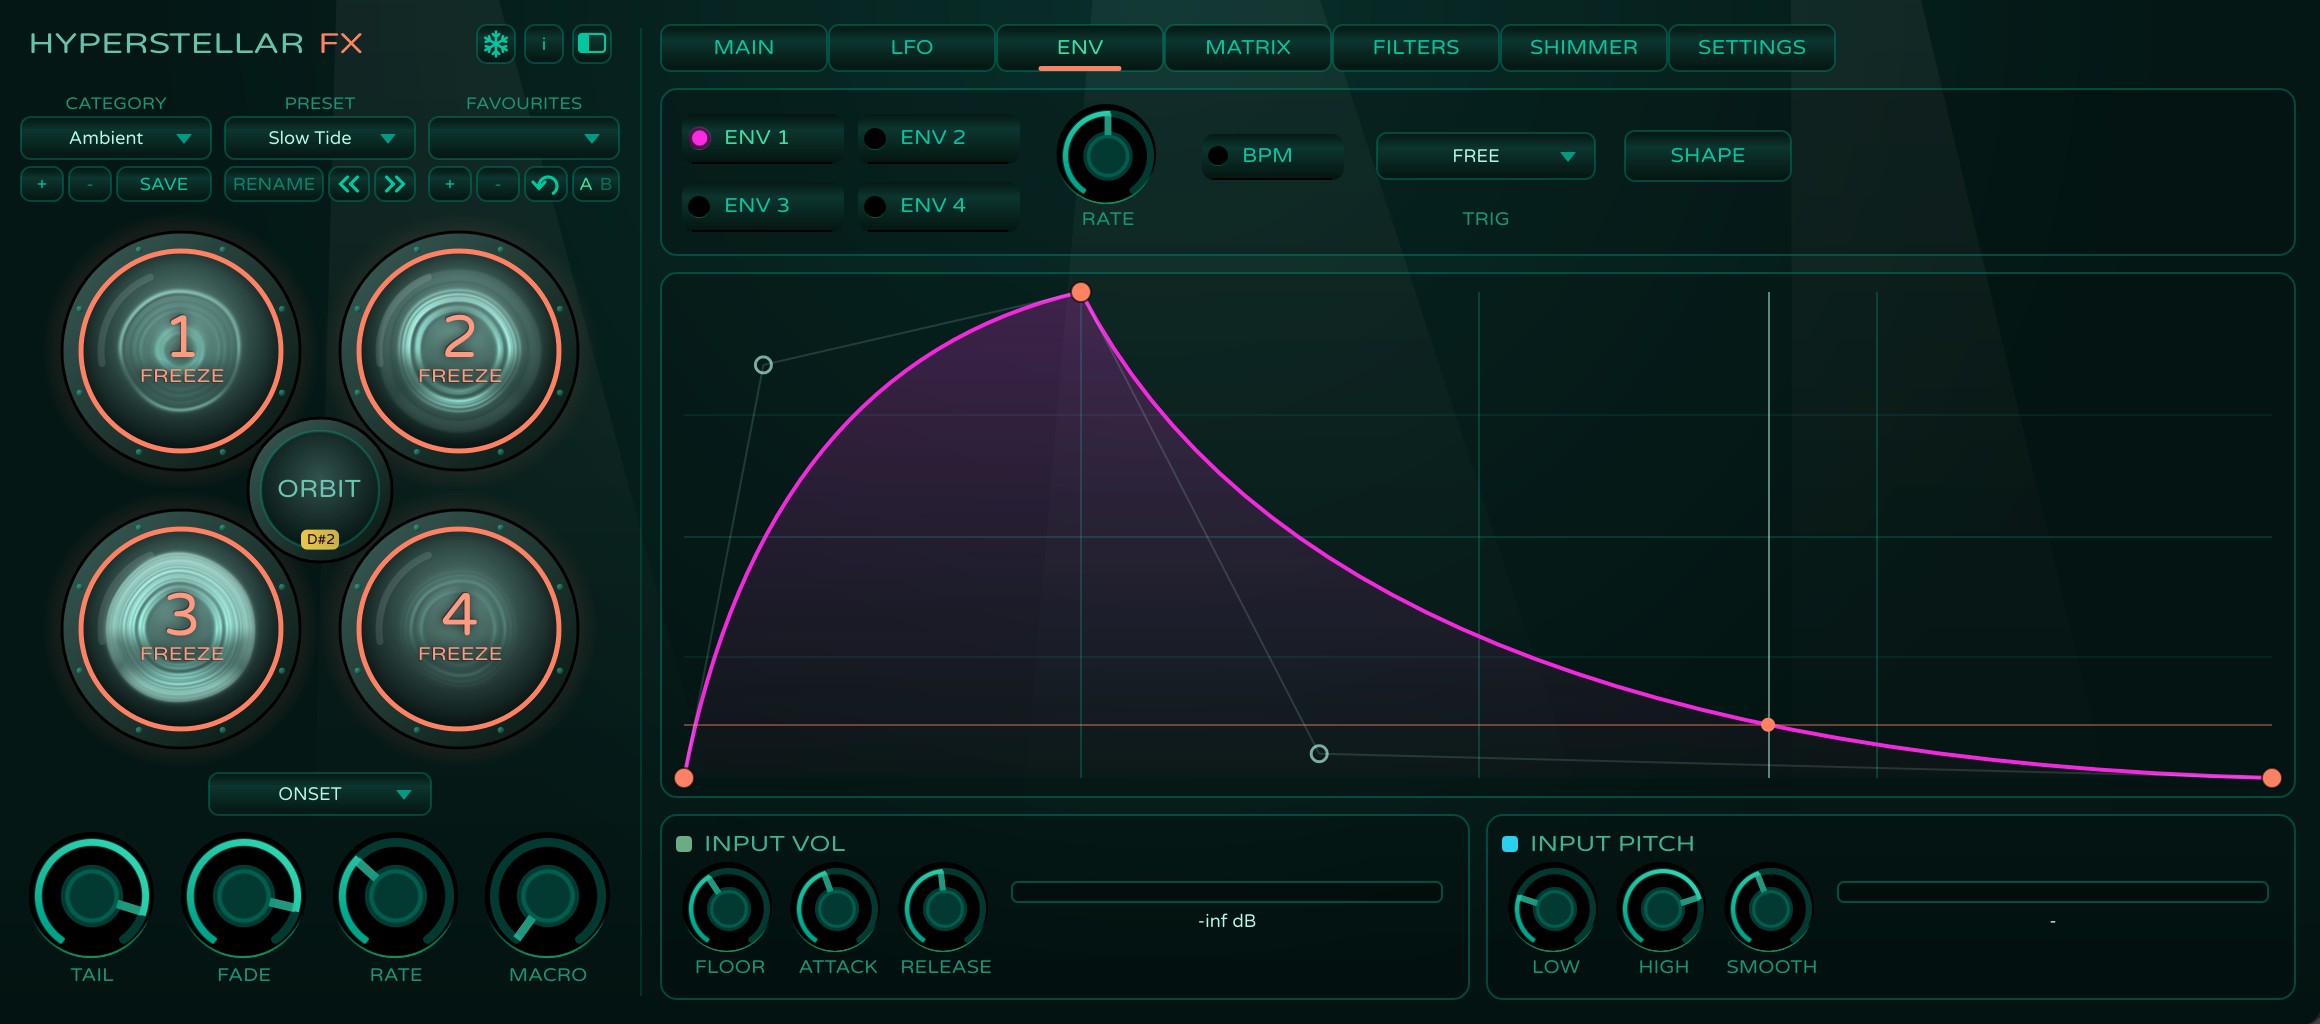
An ENV is a curve you draw, played as a loop or once. Drag a point or a round handle (it bends the segment); double-click to add or remove a point. With BPM on, points snap to 1/16 — hold Alt to place them freely. SHAPE offers ready curves. RATE is 0.01–20 Hz or a division from 16 bars to 1/16; TRIG works as for the LFOs.
- INPUT VOL follows the input level: FLOOR and below = 0, 0 dBFS = 1, with its own ATTACK and RELEASE.
- INPUT PITCH follows the pitch of the input: the LOW note and below = 0, the HIGH note and above = 1, smoothed by SMOOTH. The panel shows the note it hears.
Macro
MACRO, the fourth knob under the portholes (next to TAIL, FADE and RATE), is a modulator you turn by hand. Assign it to as many knobs as you like — right-click each one and choose Modulator → MACRO — and one move of MACRO drives all of them at once, each through its own window (see Assigning a modulator). At 0 % the knobs sit where you set them; at 100 % they reach their lamps.
Learn a CC on MACRO with MIDI Learn, and one knob on your controller or an expression pedal shapes the whole sound — smoothly, even from a 7-bit CC. MACRO can be automated in your DAW, and its position is saved in presets. It can drive a range modulation too.
Assigning a modulator
- Right-click a knob (or Control-click on a Mac) and choose a source in Modulator.
- The knob shows the modulation window and a small lamp in its colour in the upper left corner. The window runs from the knob's position to the lamp: drag the lamp sideways to set how far the modulator moves the knob (double-click: the full range).
- Inverse Modulation turns the movement upside down. NONE removes the modulator.
Range modulation. A second modulator can move the window itself — its start, its end or both (Range modulation in the same menu). The lamp in the upper right corner sets how far: drag sideways for the start, up and down for the end.
Matrix
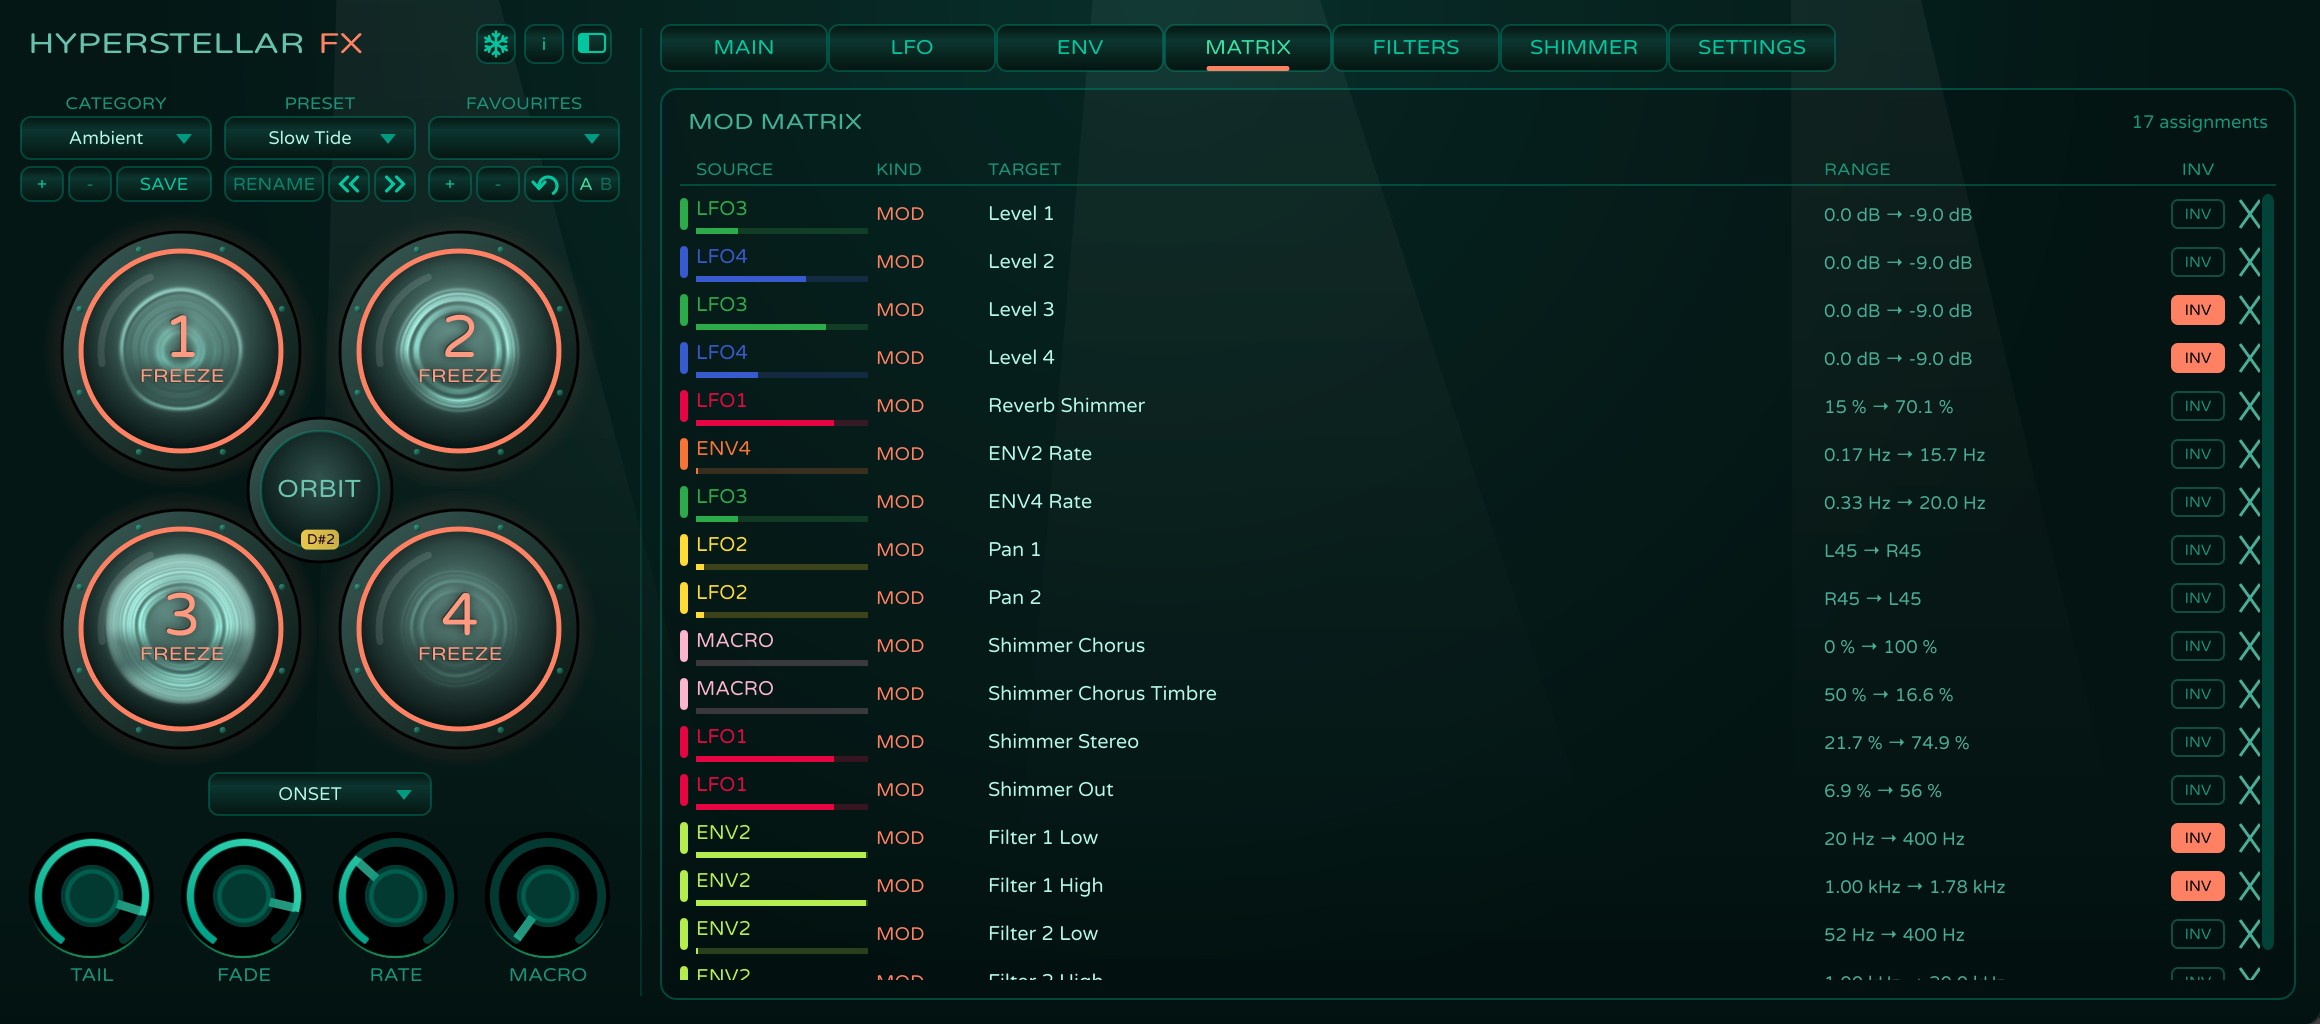
The MATRIX tab lists every assignment with its source, target and range. Click a source to change it, INV to invert it, x to remove it.
MIDI Learn
Every knob (apart from VOICES, LOW CUT, HIGH CUT and OUT on the SHIMMER tab) can follow a knob or fader on your MIDI controller, and every button — the FREEZE portholes, ORBIT and its PAUSE, M and S, the filters' IN and OUT — a CC or a note, from a pad or a footswitch.
- Right-click the control (or Control-click on a Mac) and choose Learn Midi CC#.
- Yellow brackets appear around it: it is waiting.
- Move a knob, press a pad or step on a footswitch. A badge on the control now shows the CC number or the note.
Right-click again to Remove the assignment, or to Cancel while a control is waiting. One CC can drive several controls. A button switches on every press (a CC going up through 64, or a note-on), so set your footswitch to momentary.
On a knob with a modulator, the CC moves the whole modulation window; with range modulation as well, it sets the window's width.
The assignments are saved with your session (and by the standalone application), not in presets. To start every new instance with your controller already mapped, save them as the default MIDI map. A program change message loads the Nth preset of the current category.
Presets
The preset bar sits under the title. Choose a CATEGORY and a PRESET, or step through them with << and >>.
- The factory presets come in the categories Ambient, Evolving, Live, Chaotic, Rhythmic and Spectral. They are read-only: SAVE on a factory preset saves a copy in User presets.
- + saves a new preset, − deletes one, RENAME renames it. Right-click CATEGORY to make, rename or delete categories of your own, and right-click PRESET to move a preset to another of them, or Reset to Init to start from the default settings (UNDO brings back what you had).
- Favourites: add the current preset with +, remove it with −, and pick from FAVOURITES.
- UNDO goes back to what you had before loading a preset (right-click: redo). A/B compares two settings (right-click: copy).
- A * after the name means you have changed the preset since loading it.
A preset holds the sound: every parameter, the modulation assignments and the drawn envelopes. It does not hold the frozen layers (save them in SAVED FREEZES), ORBIT on or off, MUTE and SOLO, MIDI Learn or the SETTINGS — so loading a preset while layers are frozen lets them play on through the new settings. How the change sounds is set in PRESET CHANGE.
Saved freezes
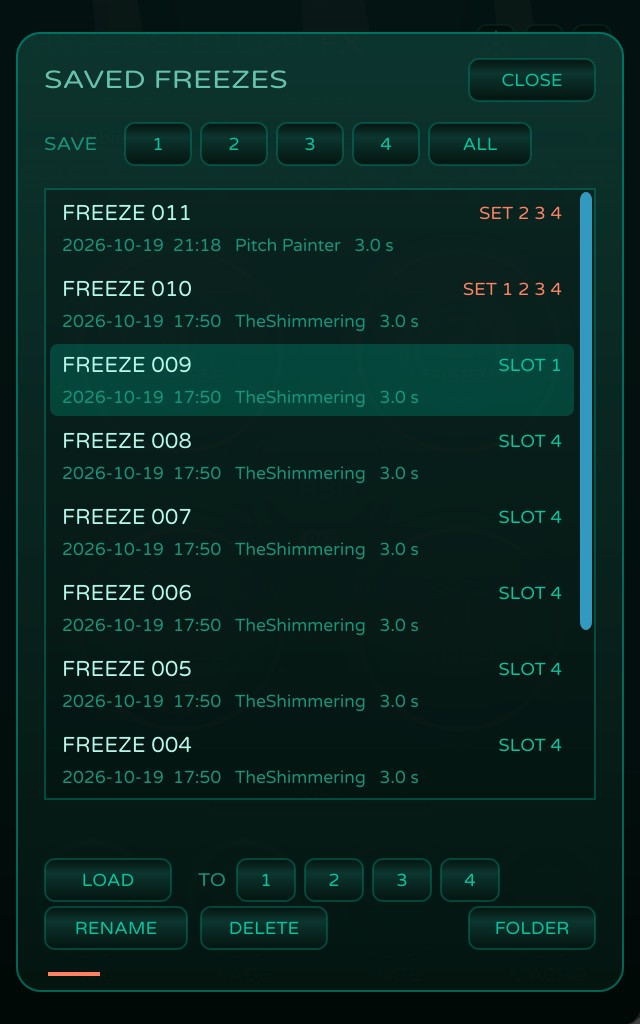
A frozen layer you like can be kept for later — for another project or another day — and brought back sounding as it did. The snowflake in the header opens the SAVED FREEZES panel.
Saving
- One layer (a slot) — Cmd-click a lit porthole (Ctrl-click on Windows), or click its number after SAVE in the panel, or right-click the porthole and choose Save freeze N.
- All frozen layers (a set) — Cmd-click ORBIT (Ctrl-click on Windows), or ALL in the panel, or right-click ORBIT and choose Save all freezes (set).
There is no name to type: the entries are numbered FREEZE 001, 002… and a short note under the portholes confirms the save (or says that nothing is frozen). Each entry remembers the date and time and the preset that was loaded.
The panel
The list shows the newest entries first: the name, SLOT with its FREEZE number or SET with the layers it holds, the date and time, the preset and the length.
- LOAD (or double-click, or Return) — brings the entry back where it was saved from: a slot onto its FREEZE, a set onto its layers, and the other layers go off.
- TO 1–4 — loads a slot onto another FREEZE.
- RENAME — gives the entry a name of your own.
- DELETE (or the Delete key) — asks first, then moves the file to the Trash.
- FOLDER — shows the folder with the files.
A loaded layer fades in over FADE; if that FREEZE is already playing another layer, the two crossfade. Loading does not touch ORBIT, MUTE or SOLO: a muted layer loads silently, and a running ORBIT goes on switching the layers. Entries saved in another instance of the plugin appear in the list within a few seconds.
Files
Each entry is one 24-bit FLAC file in
/Users/Shared/Soundyan/Hyperstellar FX/Saved Freezes/ (Windows:
C:\Users\Public\Documents\Soundyan\Hyperstellar FX\Saved Freezes\). It holds the few seconds of
input the layer was frozen from — not the endless tail, which Hyperstellar FX makes anew from them — and,
inside the file, the name, the date, the preset and what the plugin needs to play the layer the same way.
So a file copied to another computer comes back with the same name and sound. Opened in an audio editor,
it is just those seconds of input; audio files not saved by Hyperstellar FX do not appear in the list.
Settings
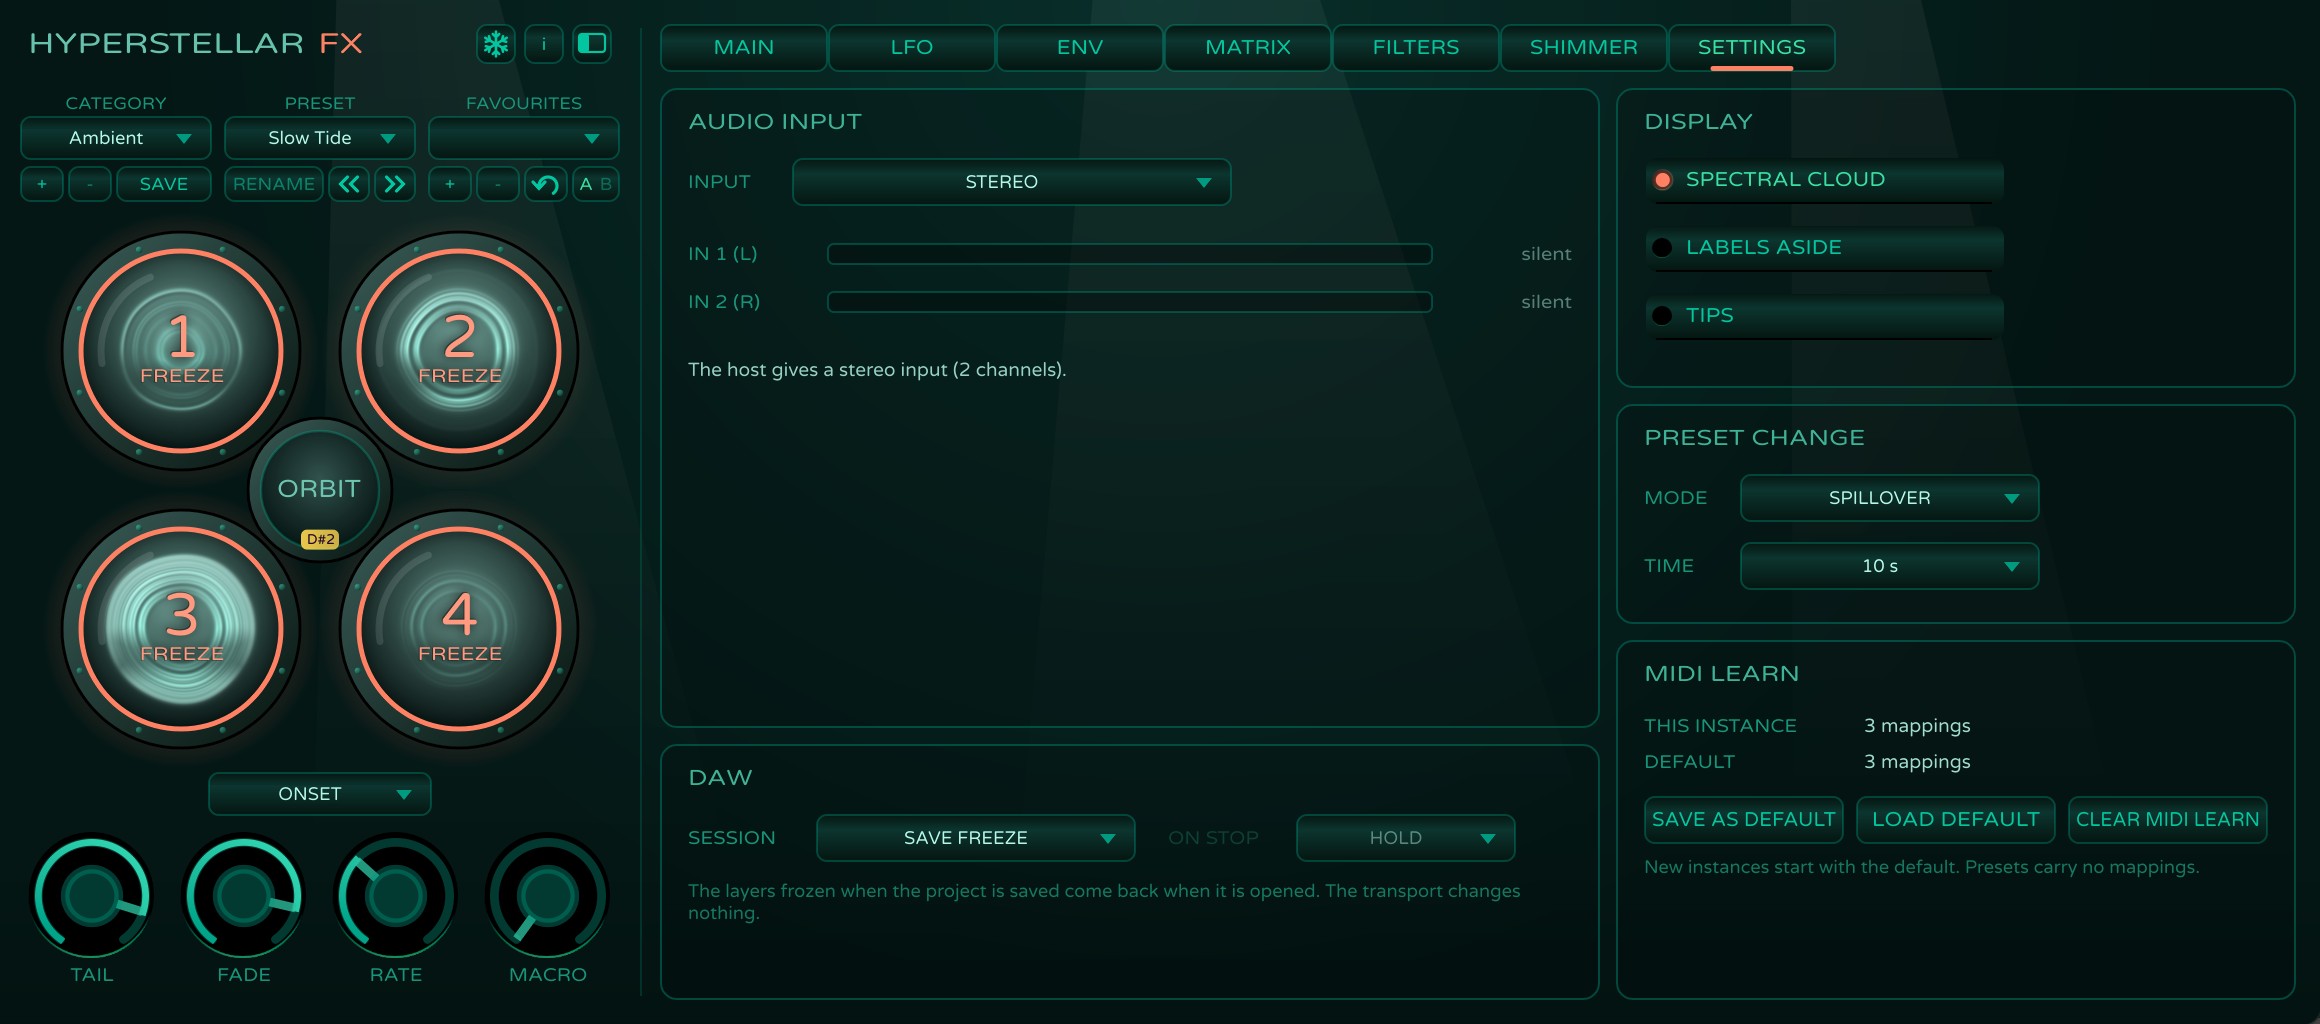
Audio input
INPUT tells Hyperstellar FX what its stereo input is: STEREO, or a mono source on INPUT 1 (L), INPUT 2 (R) or the SUM of both, sent to both sides. Use it when a microphone on one input plays only on the left. The meters show both inputs, and a hint appears when one side is silent. The setting is saved with the session; on a mono track it does nothing.
DAW session
SESSION sets how Hyperstellar FX works with your DAW project — one way or the other:
- SAVE FREEZE (default) — the layers that are frozen when you save the project come back when you open it, sounding as before, even at another sample rate. The transport changes nothing. The standalone application keeps its layers the same way between launches.
- FOLLOW DAW — every PLAY or REC starts from a clean slate: the input history, the layers whose FREEZE is off, the delay and reverb tails, ORBIT and the ONSET / NEW NOTE detection start anew, and ORBIT steps on the host's bar grid. A layer whose FREEZE is on keeps playing. So the same track with the same FREEZE (and ORBIT) automation sounds the same in every playback and in a bounce — start playback at least 3 s before a FREEZE to hear its layer made again from the same input. ON STOP sets what STOP does: HOLD — the frozen layers ring on; RELEASE — every FREEZE and ORBIT goes off and the layers fade out over FADE. In the standalone application there is no transport, so FOLLOW DAW does nothing there.
- OFF — neither: the transport changes nothing and the frozen layers are not saved with the project.
SESSION and ON STOP are saved with the session, not in presets. In every mode a layer frozen from the same input sounds the same: the subtle movement of SPARKLE and BEATS follows the frozen material, not chance.
Display
- SPECTRAL CLOUD — the layer's spectrum in each lit porthole (uses OpenGL).
- LABELS ASIDE — while a porthole shows its picture, the word FREEZE fades out and the number moves to the top.
- TIPS — the descriptions shown when you hover over a control.
Preset change
- OFF — the new settings glide in on the sound that is playing.
- SPILLOVER (default) — the new preset starts at once, while the old one's delay and reverb tails ring out beside it, for up to TIME (2–30 s).
- MORPH — the whole sound crossfades from the old preset to the new one over TIME (0.5–8 s).
Default MIDI map
The MIDI LEARN panel shows how many MIDI Learn assignments this instance has and how many the default has.
- SAVE AS DEFAULT — this instance's assignments become the default: every new instance of Hyperstellar FX starts with them (a project you open brings back its own). With no assignments here, it removes the default.
- LOAD DEFAULT — the default assignments replace this instance's.
- CLEAR MIDI LEARN — removes every assignment of this instance. The default stays.
Each of them asks first when something would be lost or overwritten.
Activating the licence
Once you have bought a licence, open the activation panel: click ACTIVATE in the panel that appears when the plugin opens, or the i button in the header. You will need the e-mail address you used for the purchase and the serial number you received by e-mail. The licence is stored on the computer and unlocks every instance of the plugin at once.
Online activation
- Enter your e-mail address and serial number.
- Click ONLINE ACTIVATION.
Offline activation
- Enter your e-mail address and serial number.
- Click OFFLINE REQUEST and choose a folder. The request file
Soundyan_OfflineAct.htmlis saved there. - Copy the file to a computer with internet access, open it in a web browser and click Send.
- Follow the instructions on soundyan.com: you will receive an e-mail with a link to your licence file
(
license.xml). Copy it to the computer with Hyperstellar FX. - Click APPLY KEY FILE and select the file.
The licence file is made for one computer: if Hyperstellar FX says it is invalid, make sure the request was generated on the computer you are activating.
Demo mode
Without a licence Hyperstellar FX is silent until you click RUN DEMO in the panel that appears when it opens. The demo has every feature and no time limit, but:
- Silence — the output is muted for one second at the end of every minute. A DEMO MODE card appears just before; click it to hide it.
- Commercial use — you may not use Hyperstellar FX for commercial purposes without a licence.
Questions? Write to support@soundyan.com.