
Online help · version 1.3
Interstellar Waterphone help
Installation, sound banks and every control of the instrument — from the Virtual Bow and the envelope to the reverb, delay and limiter, MIDI Learn and licence activation.
Introduction
Interstellar Waterphone is a virtual instrument sampled from three hand-made Interstellar waterphones (by waterphone.pl), recorded with several microphones at many dynamic levels. Every note rings for around 30 seconds, full of odd harmonics and microtonal glimpses. It runs as a standalone application and as a VST3 and AU plugin, on macOS and Windows.
All parameters are exposed to your DAW for automation, and every knob and slider can be controlled from a MIDI controller with MIDI Learn.
The full set of sounds is available after you buy a licence and activate the software. Buy the full version →
Using version 1.2 or older? Its help is here.
What's new in 1.3
Version 1.3 is a free update for everyone who owns an earlier version.
- A new, resizable interface with an output scope, level meters and a drawn envelope.
- Reverb (with shimmer), delay and limiter — the same effects as in Hyperstellar FX.
- MIDI Learn on every knob and slider, saved with your session — also when it runs as a plugin in a DAW.
- A Virtual Bow that strikes every rod it crosses, however fast you move it.
- Samples stream from disk, and notes far above a sample's root pitch are cleaner.
- Changing the sound set no longer cuts the notes that are still ringing.
- Your 1.2 sessions, saved states and automation keep working. A 1.2 session opens with the reverb off, so it sounds as it did.
Already a customer? The update improves the licensing, so after installing it you need to activate once more with the same e-mail and serial number — free of charge.
Installation
macOS
Download the installer package (.pkg), double-click it and follow the installer. It installs
the AU and VST3 plugins and the standalone application. An existing 1.2 installation is updated in place, and
the installed sound banks are used as they are.
- VST3 plugin:
/Library/Audio/Plug-Ins/VST3/InterstellarWaterphone.vst3 - AU plugin:
/Library/Audio/Plug-Ins/Components/InterstellarWaterphone.component - Standalone application:
/Applications/InterstellarWaterphone.app - Sound banks:
/Library/Audio/Sounds/Banks/InterstellarWaterphone
Windows
Download the setup file (.exe), run it and follow the installer.
Windows Defender warning. The installer is code-signed, but the certificate is new, and Microsoft Defender SmartScreen warns about every file it has not seen downloaded many times yet. This is normal for fresh software and goes away as more people install it. Step by step:
- Microsoft Edge says the file isn't commonly downloaded: click … next to the download and choose Keep.
- In Make sure you trust… open the arrow next to Delete and choose Keep anyway.
- Run the installer. When Windows shows Windows protected your PC, click More info.
- Check that the publisher is Soundyan - Sławomir Janus and click Run anyway.
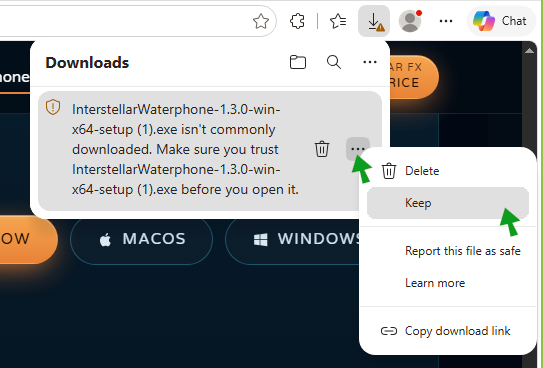
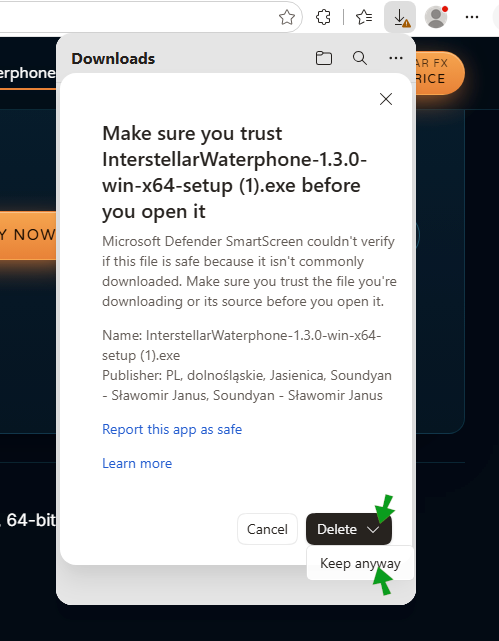
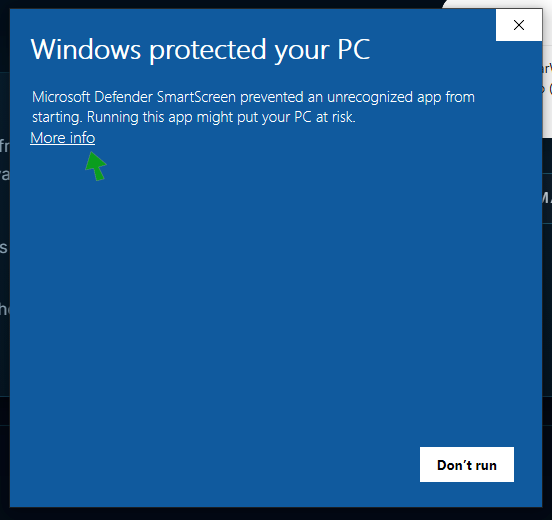
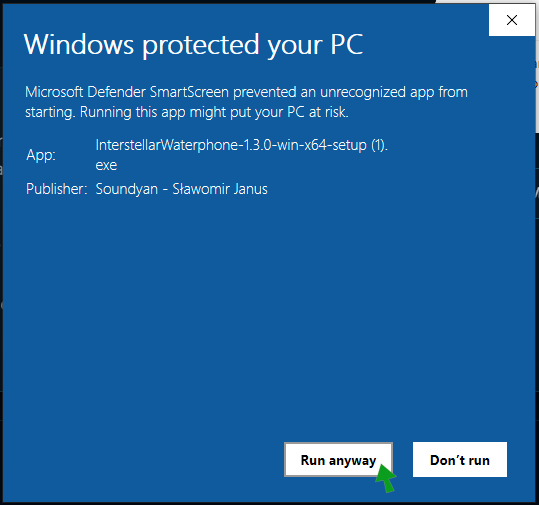
Other browsers show steps 3 and 4 only. To check the file first, right-click the setup file, choose Properties and open the Digital Signatures tab. You can also scan it with any antivirus before running it.
Sound banks
The sound banks are a folder with a sounds subfolder in it. If Interstellar Waterphone cannot
find them, the window shows Sound banks not found: click Locate sound banks… and choose the
folder (choosing the sounds folder itself works too). The location is remembered.
This is also the way to move the banks to another drive: move the folder, then open Interstellar Waterphone
and locate it. The location is stored in the file soundbanks.cfg in
~/Library/Application Support/Interstellar Waterphone/ on macOS, or in
%APPDATA%\Interstellar Waterphone\ on Windows — you no longer need to edit it by hand.
Standalone and plugin
As a plugin, Interstellar Waterphone needs no configuration of its own: insert it on an instrument track of your DAW and play it from that track. It has a stereo (or mono) output. The limiter's look-ahead adds about 5 ms of latency, which the plugin reports, so your DAW compensates for it.
The standalone application has an Options button in the upper left corner of its window:
- Audio/MIDI Settings — the output device and channels, sample rate, buffer size and the MIDI input devices.
- Save current state / Load a saved state — store all parameters in a file and bring them back later.
- Reset to default state — return every parameter to its default.
The window
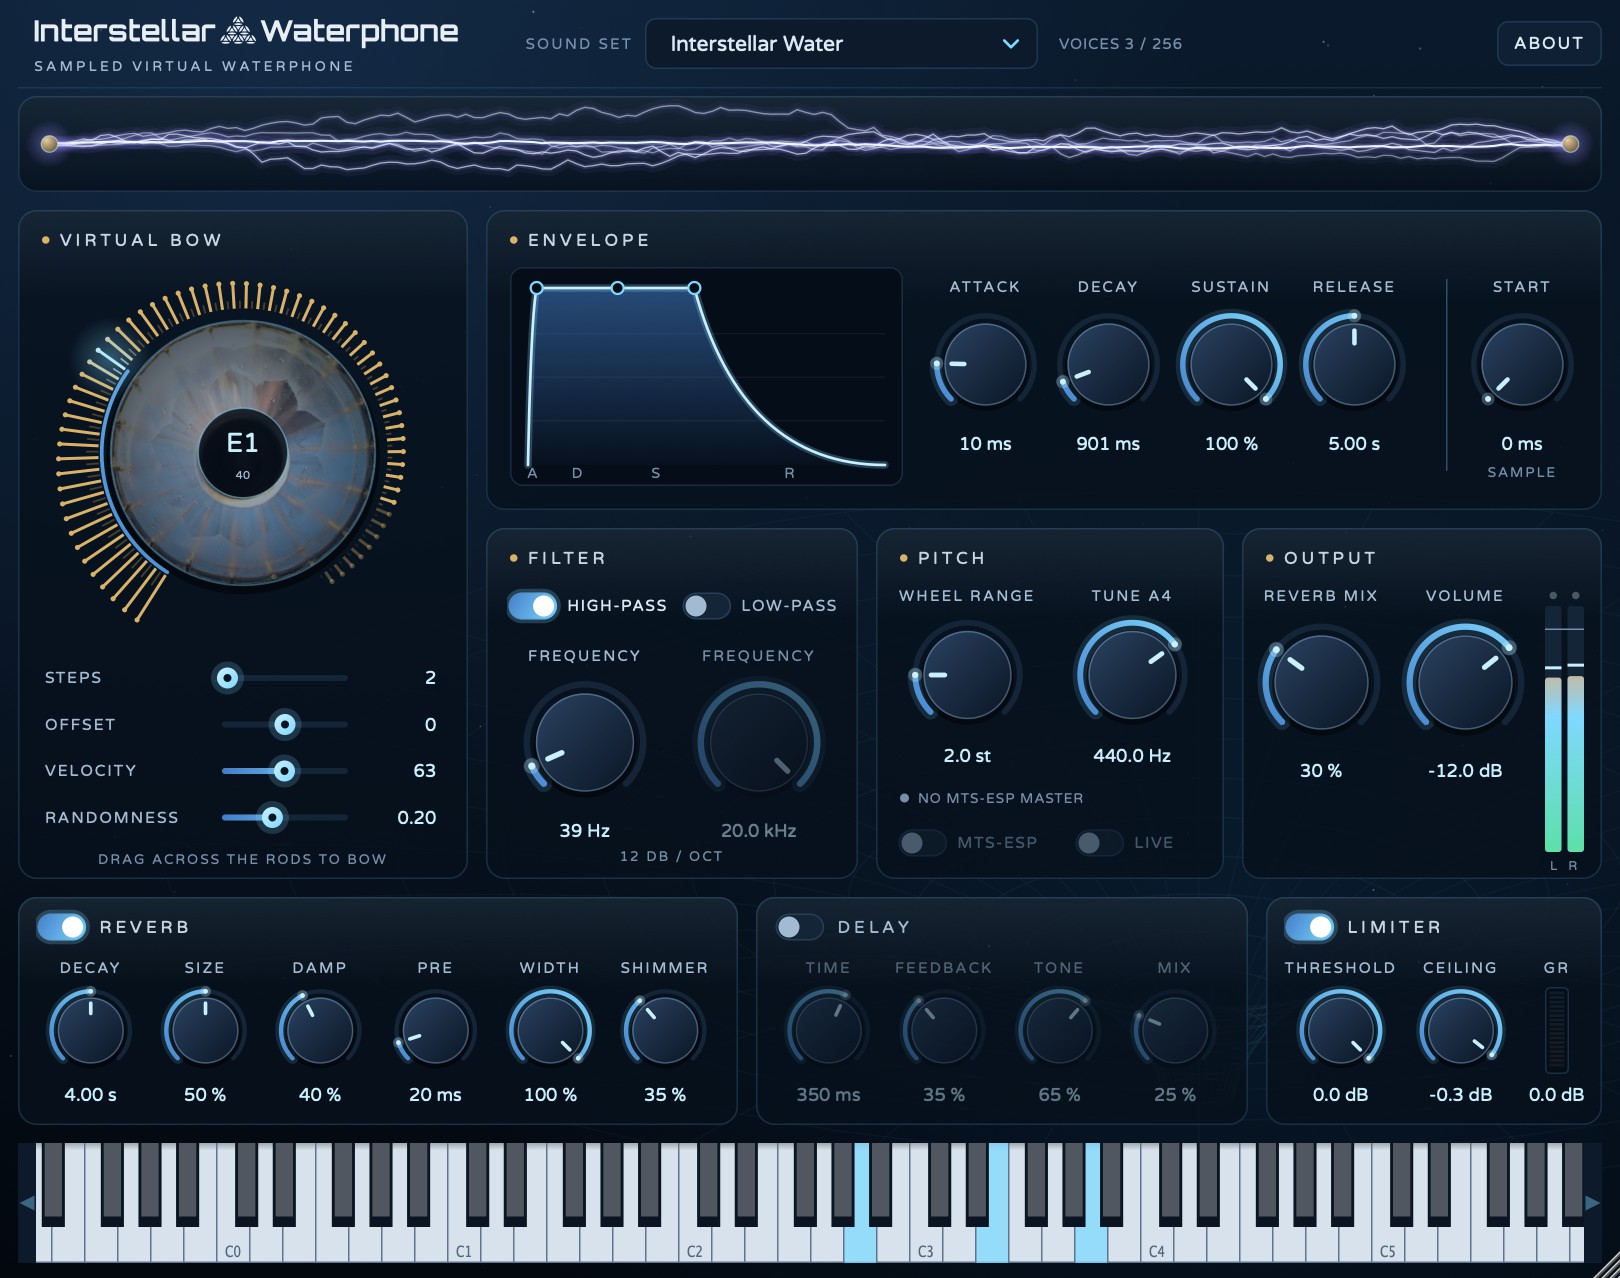
At the top are the sound set selector, the voice count and the About button (and Activate while the software is not activated). Below them a scope shows the sound as it plays. Then come the Virtual Bow, Envelope, Filter, Pitch and Output panels, the effects and the keyboard.
Drag the lower right corner to make the window bigger or smaller. Hover over a control to see what it does.
Sound sets
Choose one of the six sound sets — different waterphones and microphones — in the Sound set box: Interstellar Water, Dry Space, Dark Chimes, Light Path, Full Proximity and Slow Voltage. While a set loads, the header shows its progress; notes that are still ringing finish on the previous set.
Without a licence only the first two sets are available; the others are marked full version.
Playing
Play Interstellar Waterphone from a MIDI keyboard (in the standalone application, select it in Options → Audio/MIDI Settings), from a DAW track, with the mouse on the on-screen keyboard or with the Virtual Bow. The on-screen keyboard shows the playable range of the current sound set and lights up the notes that are playing; the arrows at its ends scroll it. Up to 256 voices can sound at once.
Virtual Bow
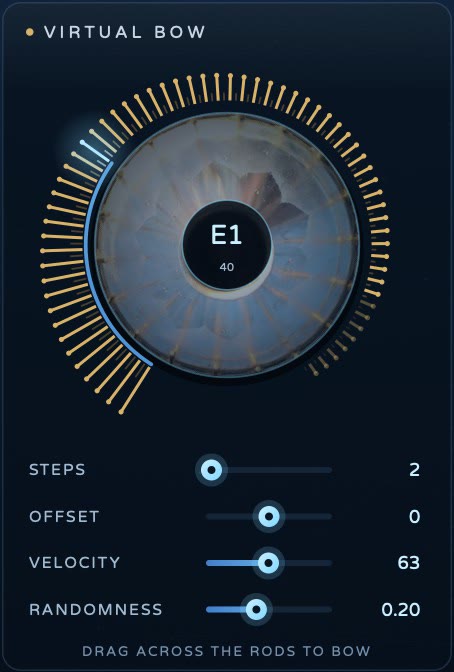
The Virtual Bow plays the waterphone with a single control. Drag across the rods around the dial: every highlighted rod you cross is struck, like a bow drawn across a real waterphone. The centre shows the note under the bow. Each bowed note is held for a time set by the Decay knob (from about 0.1 s to 6 s) and then released.
The bow can also be automated in your DAW or assigned to a MIDI knob with MIDI Learn. Assign the bow, Steps and Offset to three knobs on your controller and create sequences of sounds by ear. When automation makes the bow jump by more than two octaves at once, only the note it lands on is struck.
Steps
The bow strikes every Nth note (1–24 semitones). With Steps at 4 and Offset at 0 it strikes notes 0, 4, 8, 12, 16… — four semitones are a major third, so a harmonic sound set sounds in major thirds. At 7 you hear perfect fifths, at 1 every note.
Offset
Shifts which notes the bow strikes, from −12 to +12 semitones. If the notes start on C with Offset at 0, then at 4 they start on E (0 – C, 1 – C♯, 2 – D, 3 – D♯, 4 – E). In harmonic sound sets this sets the key of the cascade.
Velocity
How hard the bow strikes the rods, 0–127.
Randomness
Humanises the bow by varying the velocity of each note. At 0 every note has the same velocity; at the maximum, 0.5, it varies by about ±16. For the most natural result, set it to around 0.2.
Envelope
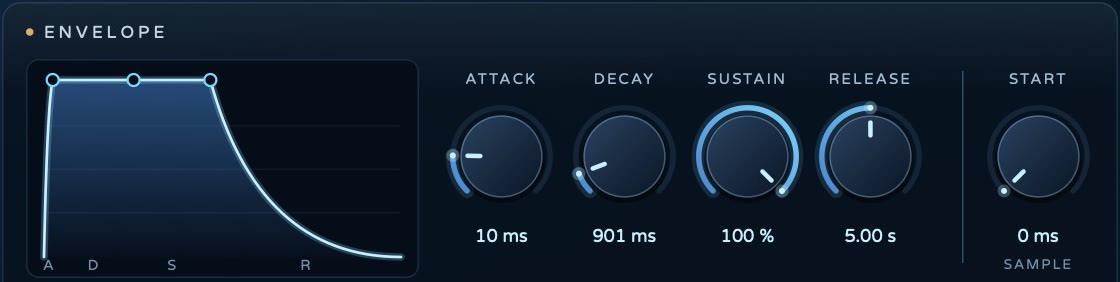
Attack, Decay, Sustain and Release shape the volume of every note; the display on the left draws the resulting envelope.
- Attack — how long the note takes to reach full volume (0.4 ms – 2 s).
- Decay — how long it then takes to fall to the Sustain level (1 ms – 10 s). It also sets how long the Virtual Bow holds its notes.
- Sustain — the volume held while the key stays down (0.1 – 100 %).
- Release — how long the sound fades out after the key is released (10 ms – 10 s).
Start offset
The Start knob (0 – 2000 ms) skips the beginning of every sample, so the notes start later in the sound — softer, without the strike. When you use it, set Attack to at least a few milliseconds to avoid a click at the start of each note.
Filter
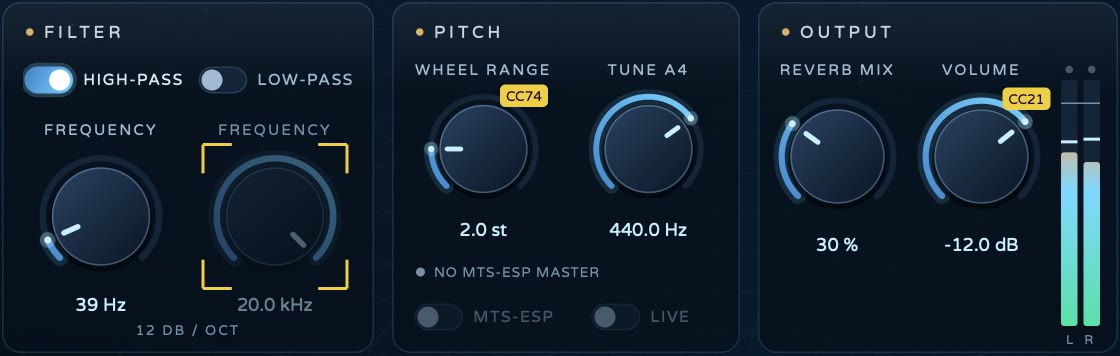
A high-pass and a low-pass filter (12 dB per octave), each with its own switch and frequency knob. The high-pass (30 Hz – 1.5 kHz) is perfect for removing rumbling bass; the low-pass (80 Hz – 20 kHz) darkens the sound.
Pitch and MTS-ESP
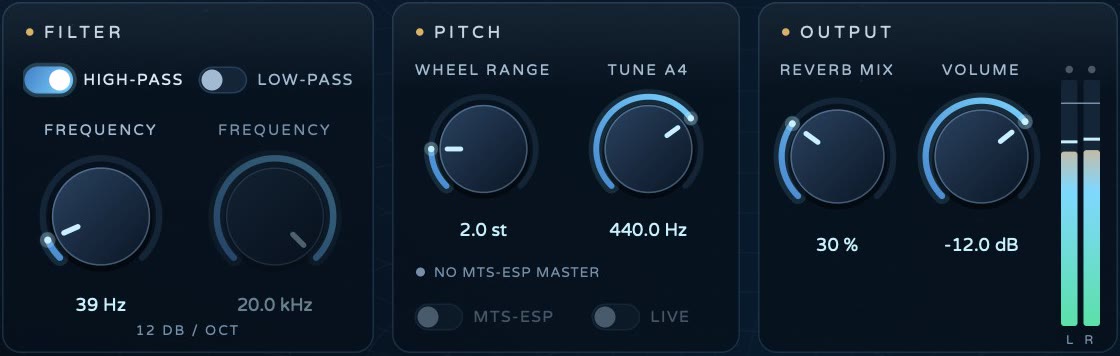
- Wheel range — how far the pitch wheel bends, 0–12 semitones.
- Tune A4 — the reference pitch, 300–500 Hz (440 Hz by default).
Interstellar Waterphone supports ODDSOUND MTS-ESP microtuning. When an MTS-ESP master plugin is running in your DAW, the panel shows MTS-ESP master connected and the switches become available: MTS-ESP makes the instrument follow the master's tuning, and Live also retunes notes that are already sounding when the tuning changes.
Output
- Reverb mix — how much of the reverb you hear.
- Volume — the output level, down to −100 dB.
The meter next to them shows the level of the left and right channels at the very end of the chain.
Effects

The reverb, delay and limiter are the same as in Hyperstellar FX. Each has a switch next to its name. The sound goes through them in this order: filter → delay → reverb → volume → limiter.
Reverb
A shimmer reverb. How much of it you hear is set by Reverb mix in the Output panel.
- Decay — the reverb time, 0.2–20 s.
- Size — the size of the space.
- Damp — darkens the tail as it decays.
- Pre — pre-delay, the gap before the reverb starts (0–200 ms).
- Width — the stereo width of the reverb.
- Shimmer — an octave-up shimmer fed into the tail.
Delay
Echoes before the reverb, so the repeats ring in the same space.
- Time — the time between repeats, 1 ms – 2 s.
- Feedback — how many repeats.
- Tone — the brightness of the repeats.
- Mix — the level of the repeats.
Limiter
The last stage of the instrument: it keeps the output from going above the ceiling.
- Threshold — the level the peaks are held down to (−24 to 0 dB). Lower settings add the same amount of makeup gain, so the sound gets louder and denser.
- Ceiling — the highest level the output reaches (−12 to 0 dB).
- GR — shows how much the limiter is reducing the level.
MIDI Learn
Any knob or slider — including the Virtual Bow and the effect knobs — can be controlled by a knob or fader on your MIDI controller (MIDI CC). This works both in the standalone application and in a DAW, and the assignments are saved with your session or saved state.
Assigning a controller
- Right-click the control (or Control-click on a Mac) and choose Learn MIDI CC#.
- Yellow brackets appear around it: it is waiting for a CC message.
- Move a knob or fader on your controller. The control now follows it, and a label shows the CC number.
In the standalone application, make sure your controller is selected as a MIDI input in Options → Audio/MIDI Settings.
Removing or cancelling
Right-click the control again and choose Remove MIDI CC# Automation. While a control is waiting, the same menu offers Cancel MIDI CC# Learn.
Automation in a DAW
Every parameter can also be automated in your DAW the usual way, through the plugin's parameter list. Use whichever you prefer — DAW automation for recorded moves, MIDI Learn for playing live.
Activating the licence
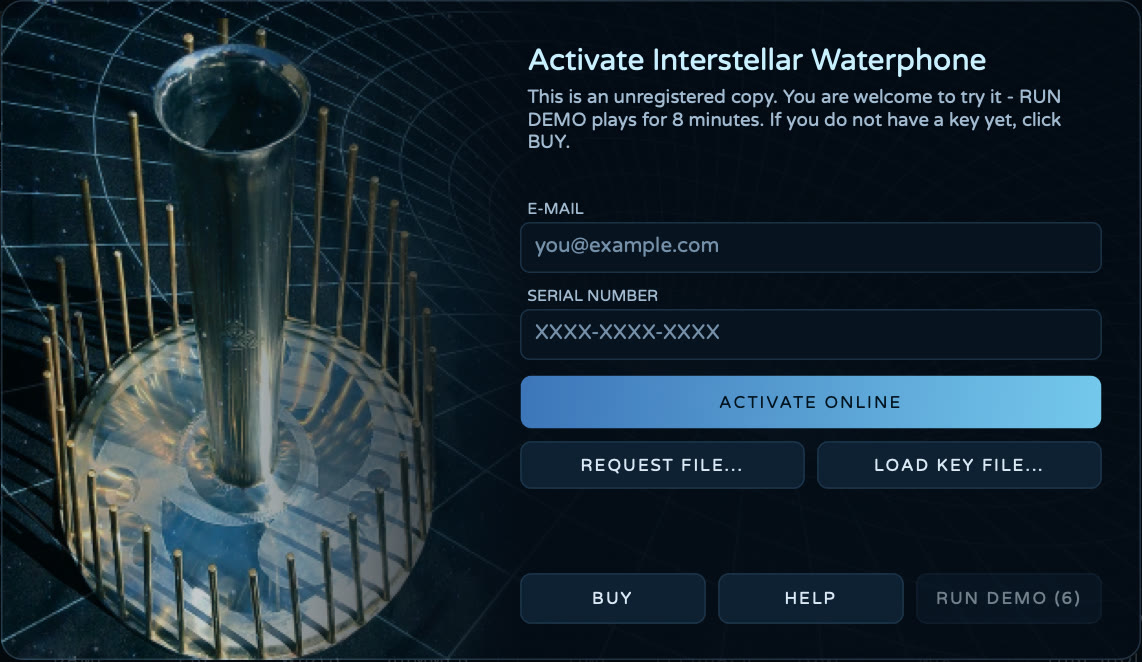
Once you have bought a licence, click Activate in the header to open the activation panel. You will need the e-mail address you used for the purchase and the serial number you received by e-mail. There are two ways to activate: online (recommended) and offline, for a computer without internet access.
Updating from 1.2? Version 1.3 uses improved licensing, so each computer needs a one-time activation after the update. Your purchase is intact — activate with the same e-mail and serial number, at no charge.
Online activation
- Enter your e-mail address and serial number.
- Click Activate online.
When the activation succeeds, the licence is saved on your computer and all six sound sets unlock.
Offline activation
- Enter your e-mail address and serial number.
- Click Request file… and choose a folder. The activation request
ISTWaterphone_OfflineAct.htmlis saved there. - Copy the file to a computer with internet access and open it in a web browser. On the Interstellar Waterphone Activation Form click Send.
- You will receive an e-mail with a link to your key file (
license.xml). Download it and copy it to the computer with Interstellar Waterphone. - Click Load key file… and select the file.
The key file is made for one computer: if Interstellar Waterphone says the key is invalid, make sure the request file was generated on the computer you are activating.
Demo mode
Without activation Interstellar Waterphone runs as a demo. When it opens, the activation panel appears; after a few seconds click Run demo to start playing. The header then shows the remaining demo time.
- Time — the demo plays for 8 minutes, then the audio is switched off. Restart the application (or reload the plugin) to play some more.
- Sound sets — only the first two of the six sound sets are available.
- Commercial use — you may not use Interstellar Waterphone for commercial purposes without a licence.
Questions? Write to support@soundyan.com.